User Guide
TAbby Dabby is a desktop app to help teaching assistants (TAs) with their administrative duties. It is optimised for TAs who are comfortable using a command line interface (CLI) but still want a graphical user interface (GUI). If you are a TA who can type fast, TAbby Dabby can get your administrative tasks done faster than traditional GUI apps.
- Introduction
- Quick start
- General notes about using the app
- Commands
- FAQ
- Known issues
- Command summary
Introduction
TAbby Dabby helps TAs with four main tasks:
- Managing the contact details of students, co-TAs, and lecturers. TAbby Dabby calls these people Persons.
- Managing the tutorial groups that you are a part of. TAbby Dabby calls these tutorial groups Groups.
- Tracking the attendance of students in your tutorial groups. TAbby Dabby calls this Attendance.
- Tracking the assignments of your tutorial groups. TAbby Dabby calls these Assignments.
This User Guide uses the terms Persons, Groups, Attendance, and Assignment frequently to refer to these entities.
![]() Relationship between each entity
Relationship between each entity
- Each Group can have multiple Persons (members) in it, and each Person can be a member of multiple Groups.
- Each Group can have multiple Assignments in it, but each Assignment can only belong to one Group.
- Each Person has an Attendance record for each Group they belong to, and each Group has an Attendance record for each Person in it.
There are two separate lists in this app: the person list and the group list. The person list contains all the persons, while the group list contains all the groups.
Quick start
-
Install the Java Development Kit version
17.
Windows users: Install JDK 17 installed from here
Mac users: Ensure you have the precise JDK version specified here. - Ensure that your installation works.
- Open a command terminal (Windows: search for cmd , Mac: use Spotlight to find Terminal )
- Verify installation by typing
java -versionin your terminal; it should successfully output JDK version 17.
-
Download the latest
TAbbyDabby.jarfile from here. -
Copy the file to the folder you want to use as the home folder for your TAbby Dabby.
-
Open a command terminal,
cdinto the folder you put the jar file in, and use thejava -jar TAbbyDabby.jarcommand to run the application.
The following GUI should appear in a few seconds. Note how the app contains some sample data.
-
Type the command in the command box and press Enter to execute it. e.g. typing
helpand pressing Enter will open the help window.
Some example commands you can try:-
add n/Jensen Huang p/98765432 e/jensenh@nvidia.com a/21 Lower Kent Ridge Rd, Singapore 119077: Adds a person namedJensen Huangto the list of persons. -
delete 3: Deletes the 3rd person shown in the current person list. -
list: Lists all persons. -
clear: Deletes all persons. -
add-group n/CS2103T T12: Adds a new group namedCS2103T T12to the list of groups. -
exit: Exits the app.
-
- Refer to the next section for more details on how to use the app.
General notes about using the app
Command formats
![]() Notes about command format
Notes about command format
-
Fields in square brackets are optional; every other field is compulsory.
e.g You can fill inn/NAME [t/TAG]asn/Jensen Huang t/friendor asn/Jensen Huang, but not ast/friend. -
Fields with
… after them can be used multiple times including zero times.
e.g.[t/TAG]…can be used ast/friend,t/friend t/familyetc. -
You can fill in fields in any order.
e.g. if the command specifiesn/NAME p/PHONE_NUMBER,p/PHONE_NUMBER n/NAMEis also acceptable. -
Redundant parameters for commands that do not take in parameters (such as
help,list,exitandclear) will be ignored.
e.g. if the command specifieshelp 123, it will be interpreted ashelp. -
If you type a command with a wrong format, TAbby Dabby will display an example to guide you to re-input the command correctly.
-
If you are using a PDF version of this document, be careful when copying and pasting commands that span multiple lines as space characters surrounding line-breaks may be omitted when copied over to the application.
Common fields
Many of our commands also share similar fields. Here are some notes on them:
![]() Notes about common fields
Notes about common fields
-
NAME-related and TAG fields are case-sensitive, and must contain only alphanumeric characters, spaces, apostrophes, slashes, and dashes. This includes the
n/,g/, andt/fields.
e.g.Jensen-Huang s/o Michael O'Neilandjensen-huang s/o michael o'neilare valid and distinct names and tags. -
NAME-related fields must be unique within the same category.
e.g. If you add a person with the nameJensen Huang, you cannot add another person with the same name. Same goes for groups. -
Duplicate TAGs are merged.
e.g. If you add a person with the fieldst/friend t/friend, the person will only have one tagfriend. -
INDEX fields refer to the index number of the person (resp. group) in the person (resp. group) list that was last displayed. It must be a positive integer 1, 2, 3, …, up till the number of persons (resp. groups) in the list.
Commands
General commands
Viewing help: help
Shows a message explaining how to access the help page.
Expected output
Format: help
Expected output
The GUI displays a pop-up window with a link to this User Guide.
Example result of help:

Exiting the program: exit
Exits the program.
Format: exit
Expected output
The GUI closes and the app terminates.
Person commands
Adding a person: add
Adds a person to the person list. Useful for adding details of your students.
Format: add n/NAME p/PHONE_NUMBER e/EMAIL a/ADDRESS [t/TAG]…
Notes
- Phone numbers must have between 3 and 15 digits; they need not be unique.
Examples
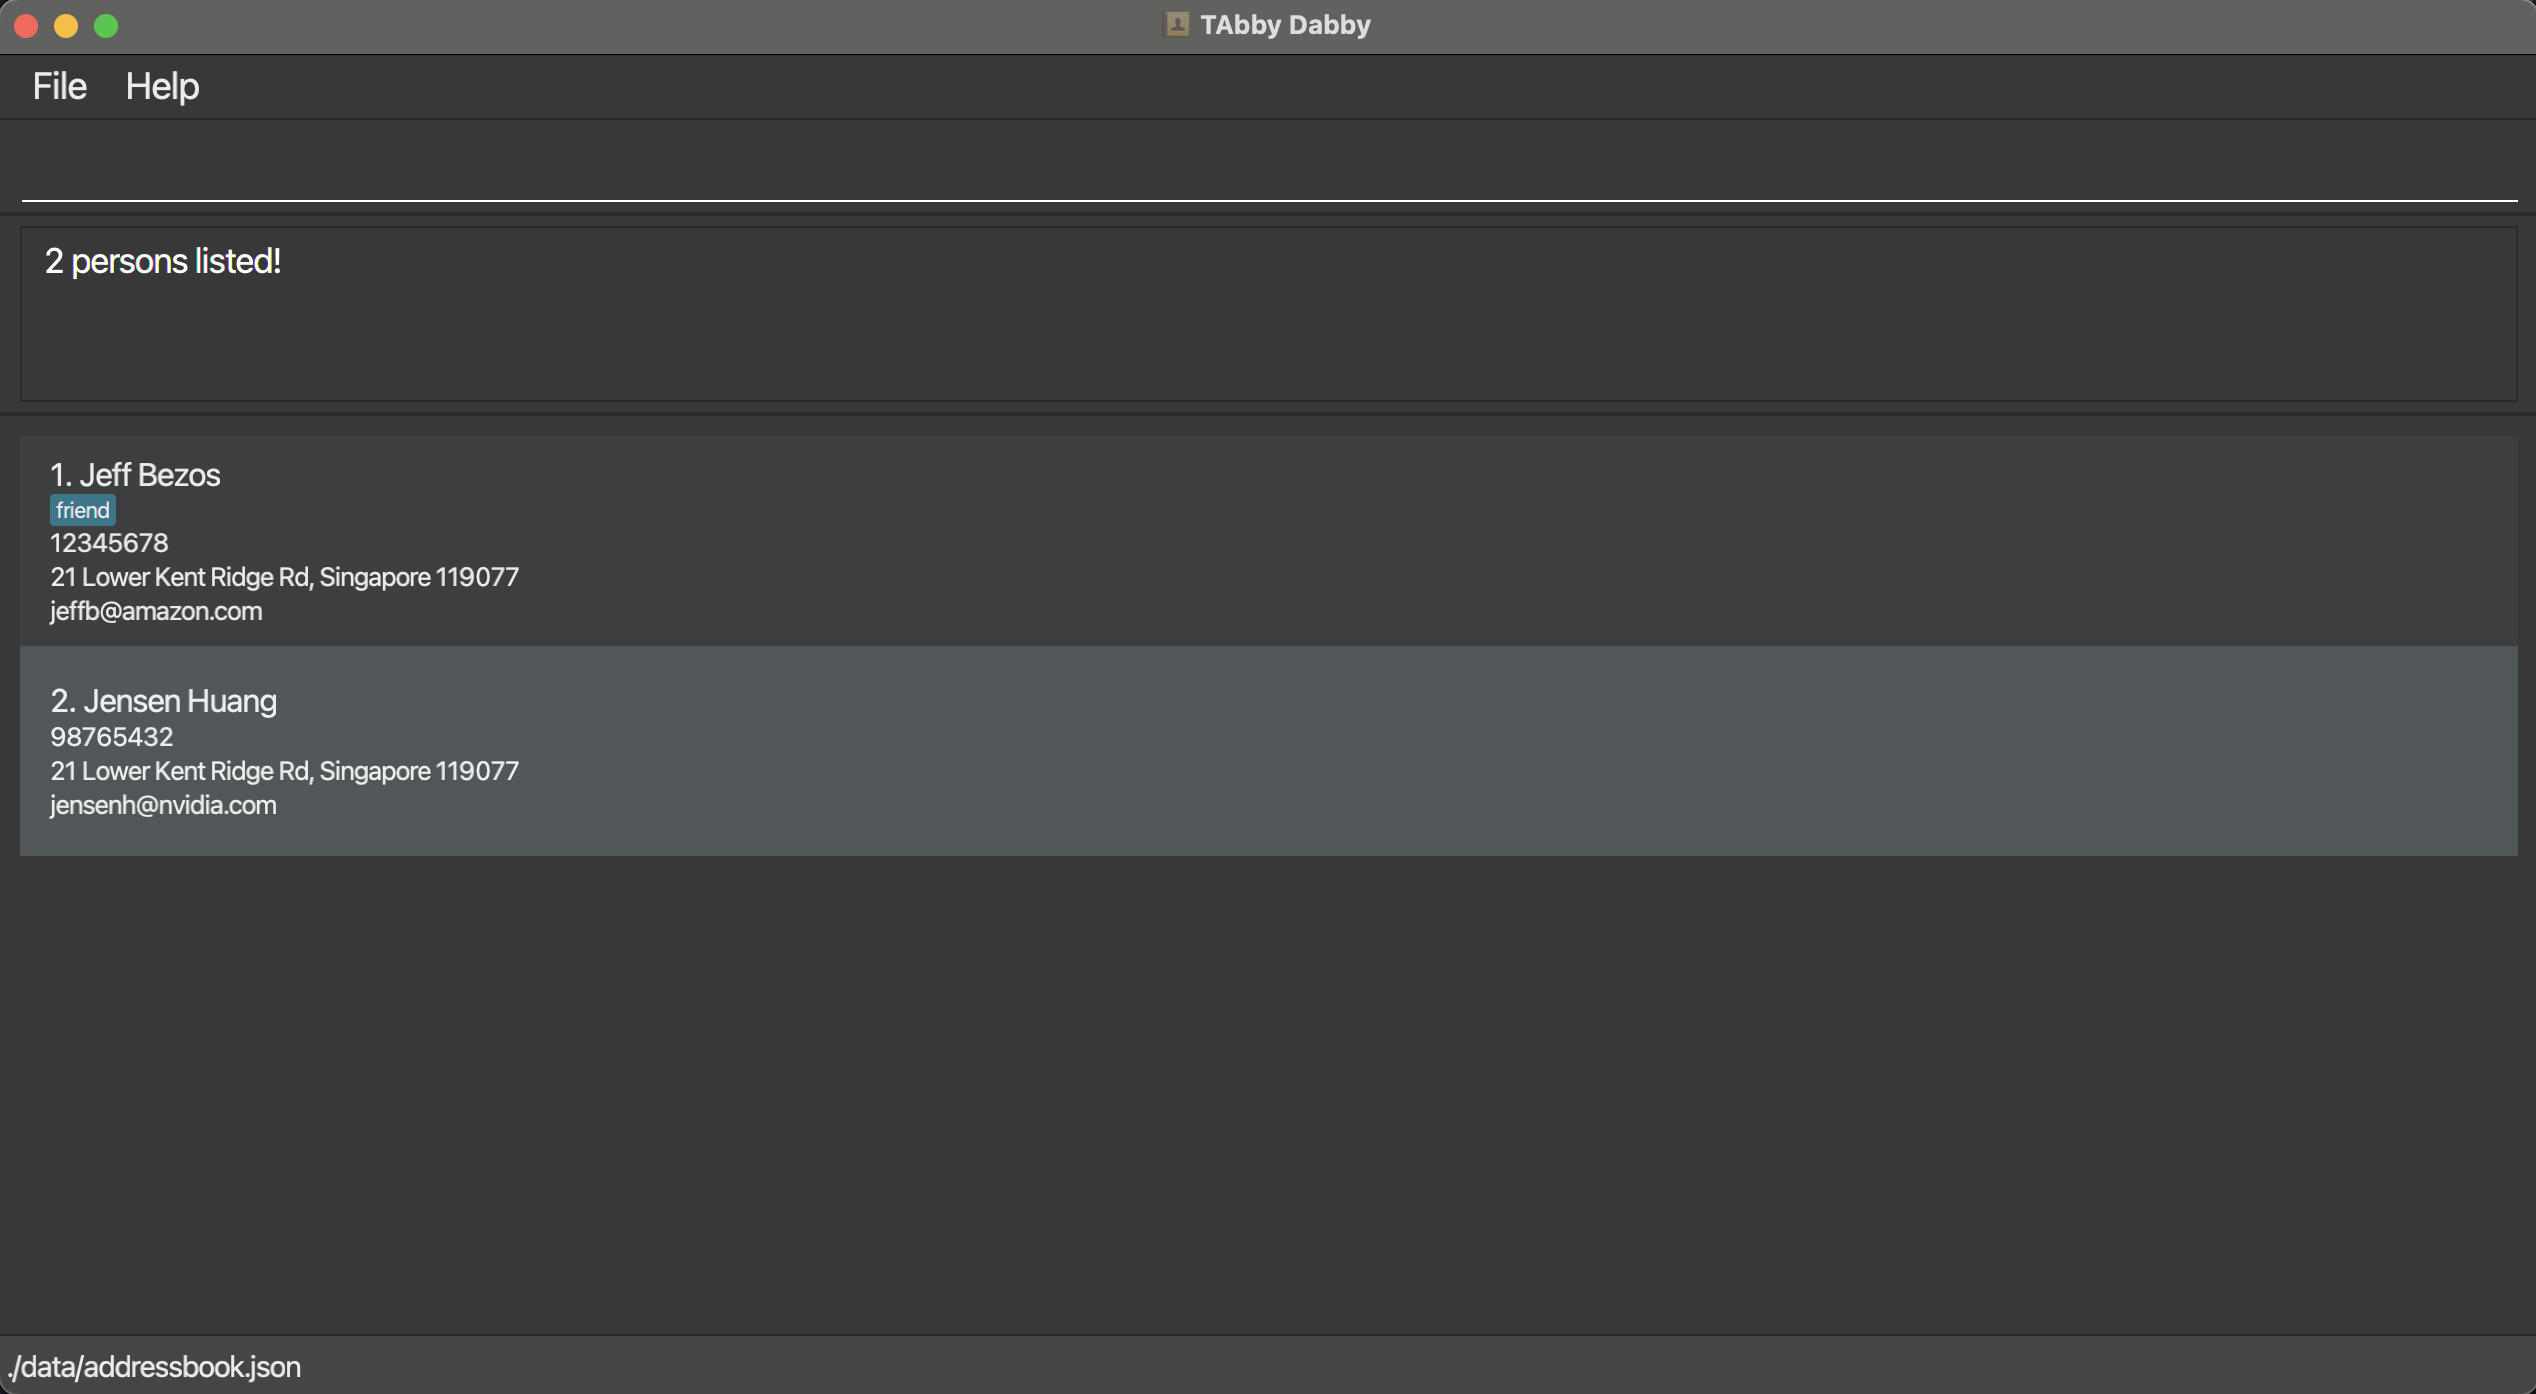
add n/Jensen Huang p/98765432 e/jensenh@nvidia.com a/21 Lower Kent Ridge Rd, Singapore 119077 t/friendadd n/Jeff Bezos p/12345678 t/friend e/jeffb@amazon.com a/21 Lower Kent Ridge Rd, Singapore 119077
Expected output
The GUI displays the person list with the new person added to the end of it.
Example result of add n/Jensen Huang p/98765432 e/jensenh@nvidia.com a/21 Lower Kent Ridge Rd, Singapore 119077 t/friends:

Known Limitations
Common names that contain slashes like S/O and D/O are supported, but not all slashes are supported, i.e., p/ a/ t/ e/, as they are not typically used in names. We plan to extend support for rarer names in the future.
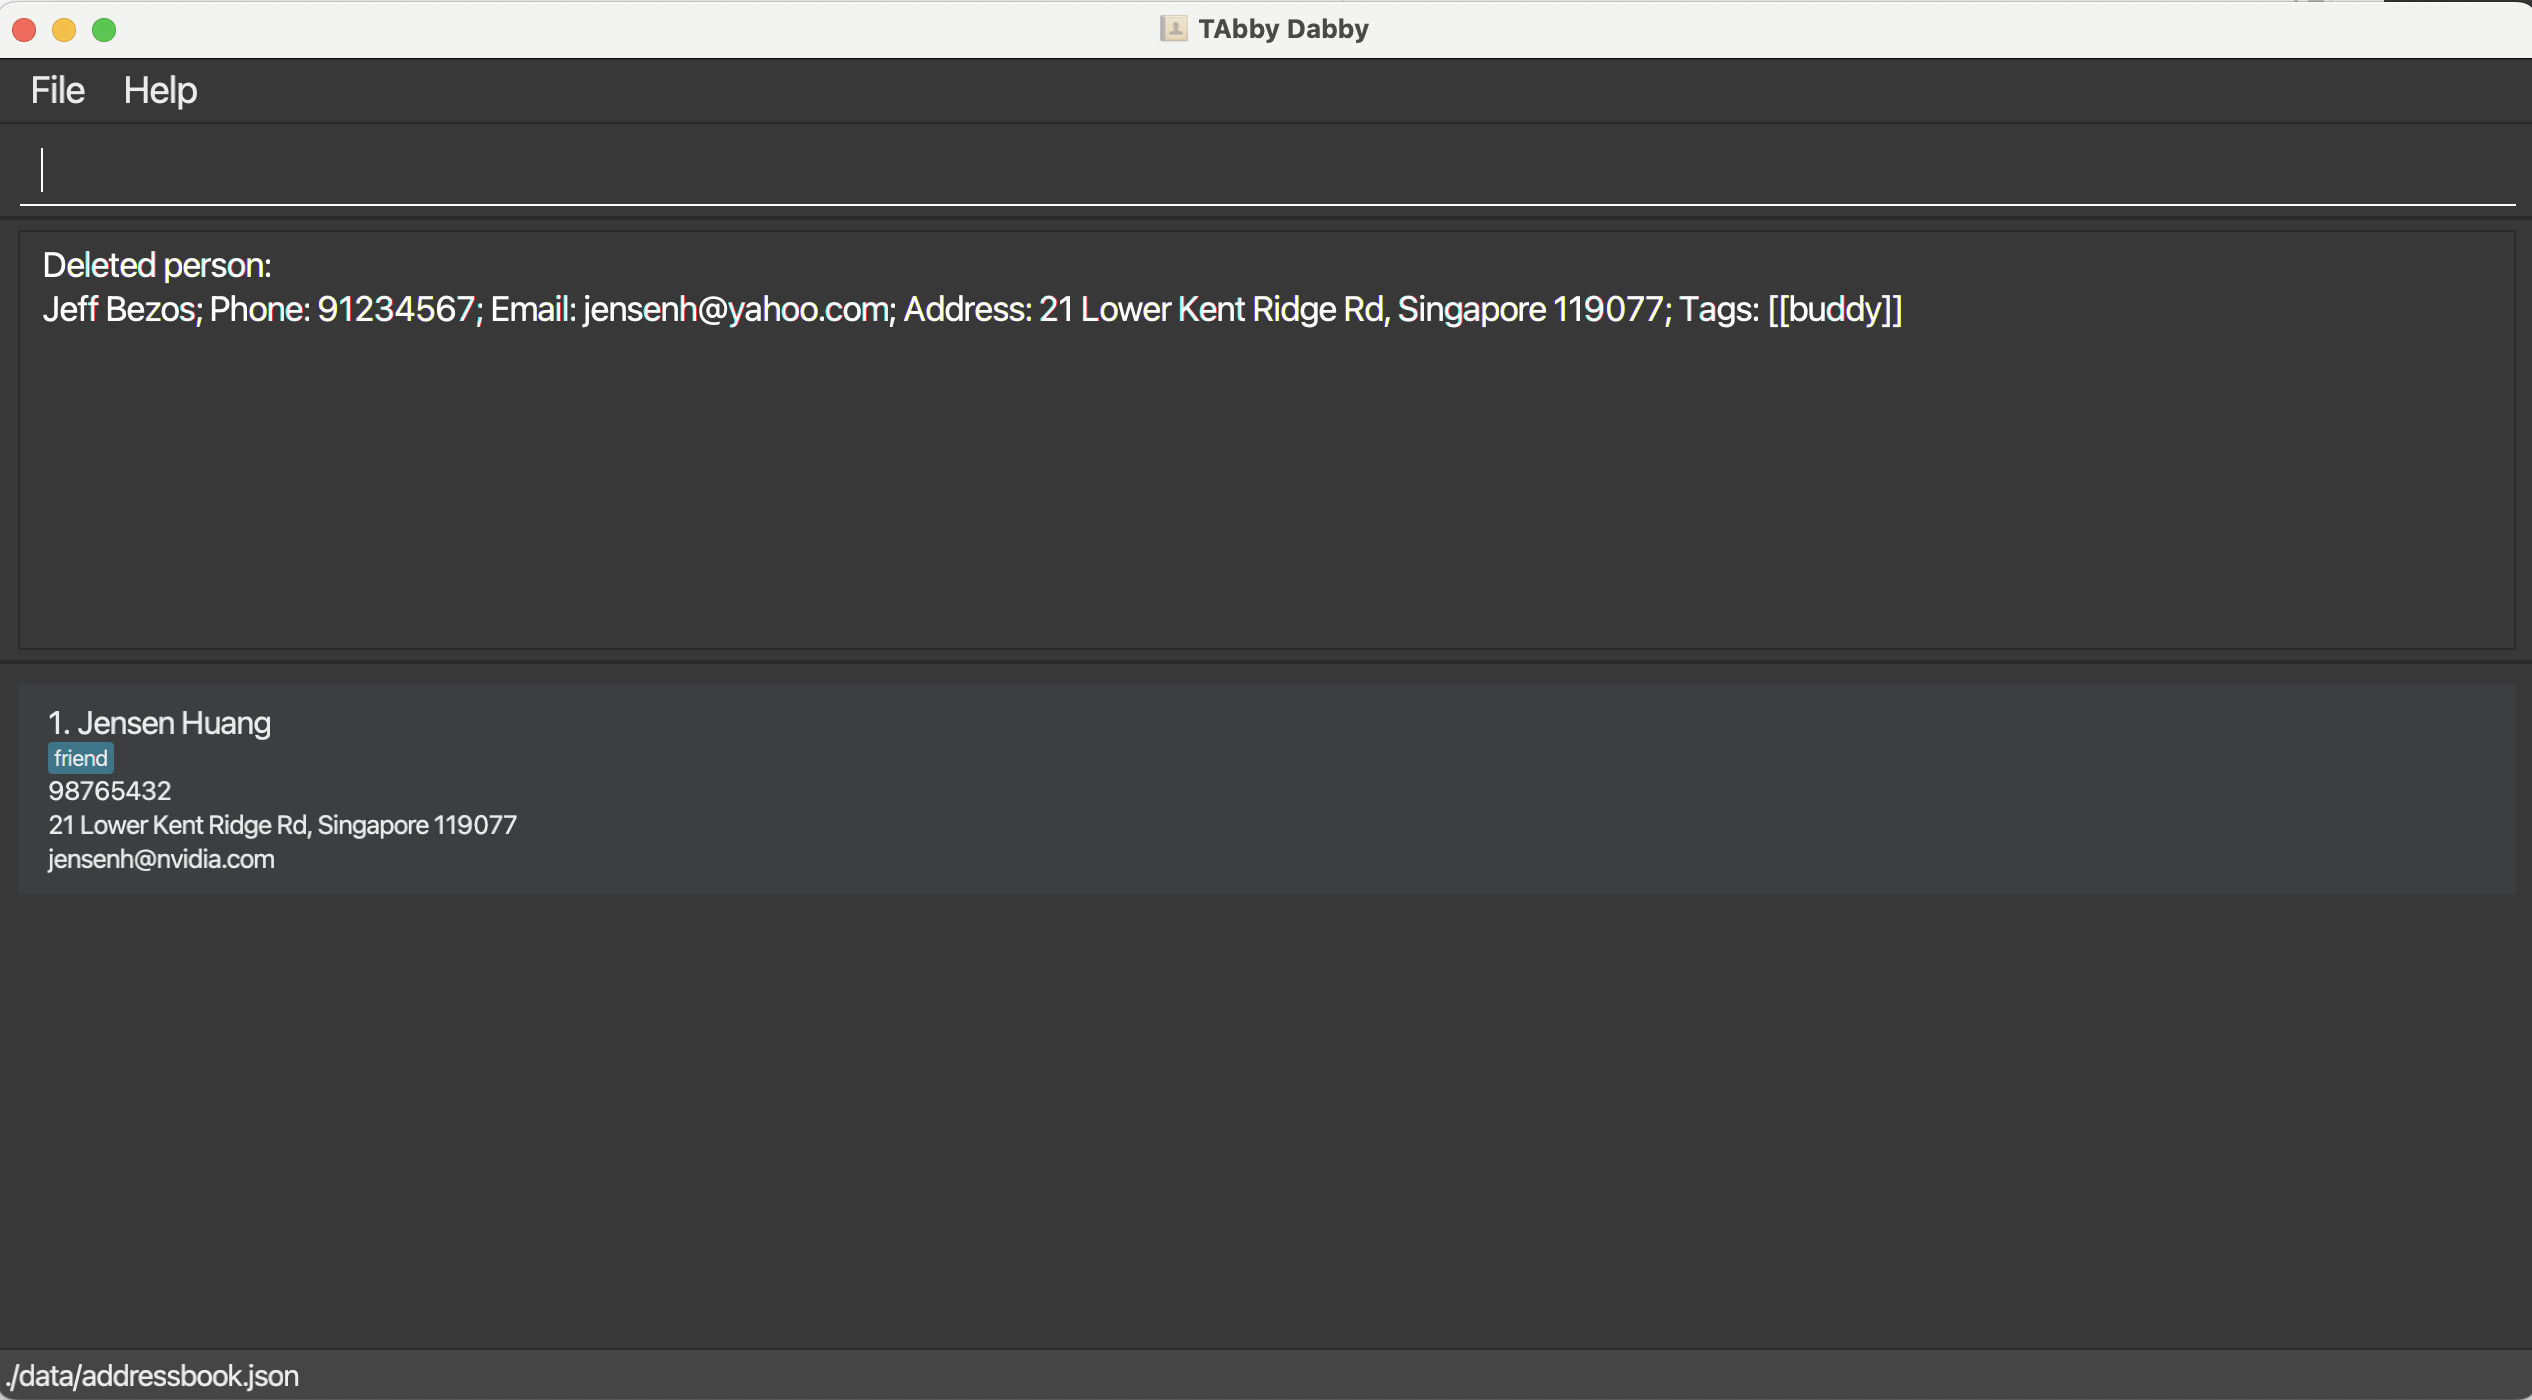
Deleting a person: delete
Deletes the specified person from the person list. Useful for removing the details of someone who is no longer a student.
Format: delete INDEX
Examples
-
listfollowed bydelete 2deletes the second person in the person list. -
find Jensenfollowed bydelete 1deletes the first person in the results of thefindcommand. Find out more about thefindcommand here.
Expected output
The GUI displays the person list command, but with the specified person removed from it. The persons that came after the deleted person will shift up to fill the gap and their indices will be updated accordingly. See add for a similar example of the expected output.
Before running delete 1:
After running delete 1:
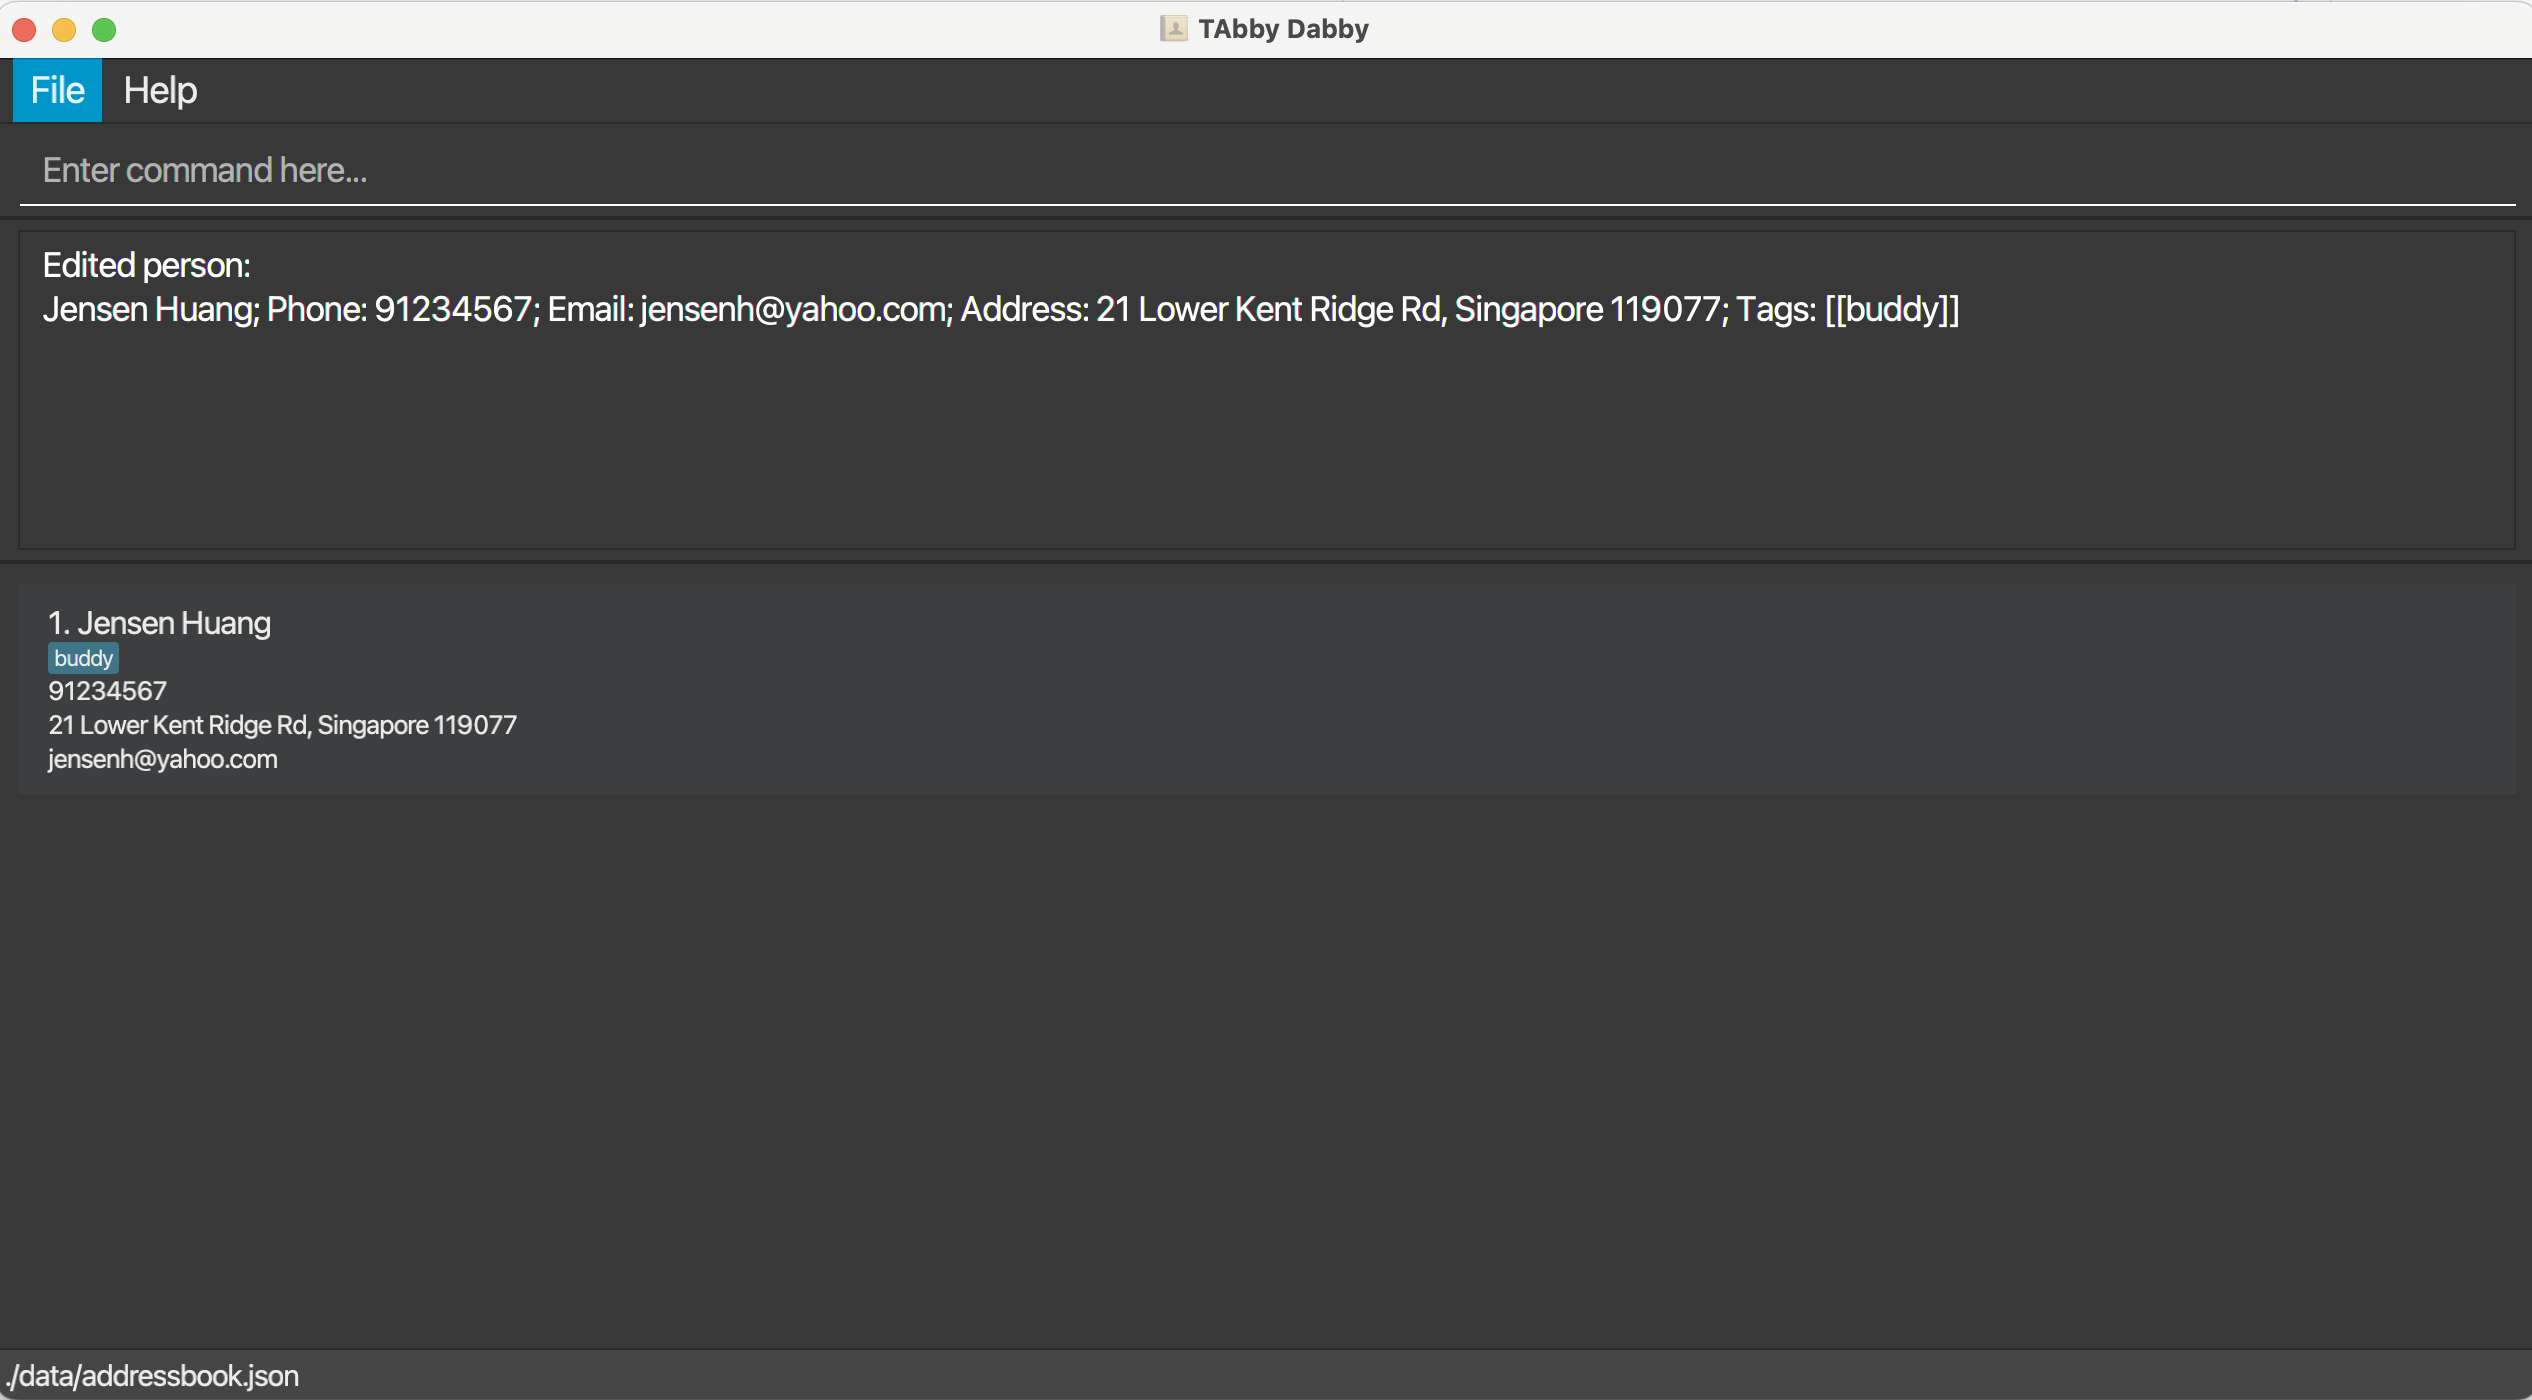
Editing a person: edit
Edits the details of the specified person in the person list.
Format: edit INDEX [n/NAME] [p/PHONE] [e/EMAIL] [a/ADDRESS] [t/TAG]…
Notes
- You must fill in at least one of the optional fields.
- Existing values will be updated to the input values.
- When editing tags, the existing tags of the person will be removed, e.g., if the person at index
2currently has the tagfrenemy, and we run the commandedit 2 t/enemy, the tagfrenemywill be removed, and a new tagenemywill be added. - You can remove all the person’s tags by typing
t/without specifying any tags after it.
Examples
-
edit 1 p/91234567 e/jensenh@yahoo.comEdits the phone number and email address of the 1st person to be91234567andjensenh@yahoo.comrespectively. -
edit 2 n/Jeff Bezos t/Edits the name of the 2nd person to beJeff Bezosand clears all existing tags. -
edit 2 n/Jeff Bezos t/friendEdits the name of the 2nd person to beJeff Bezos, clears all existing tags, and adds the tagfriend.
Expected output
Example result of edit 1 p/91234567 e/jensenh@yahoo.com t/buddy:
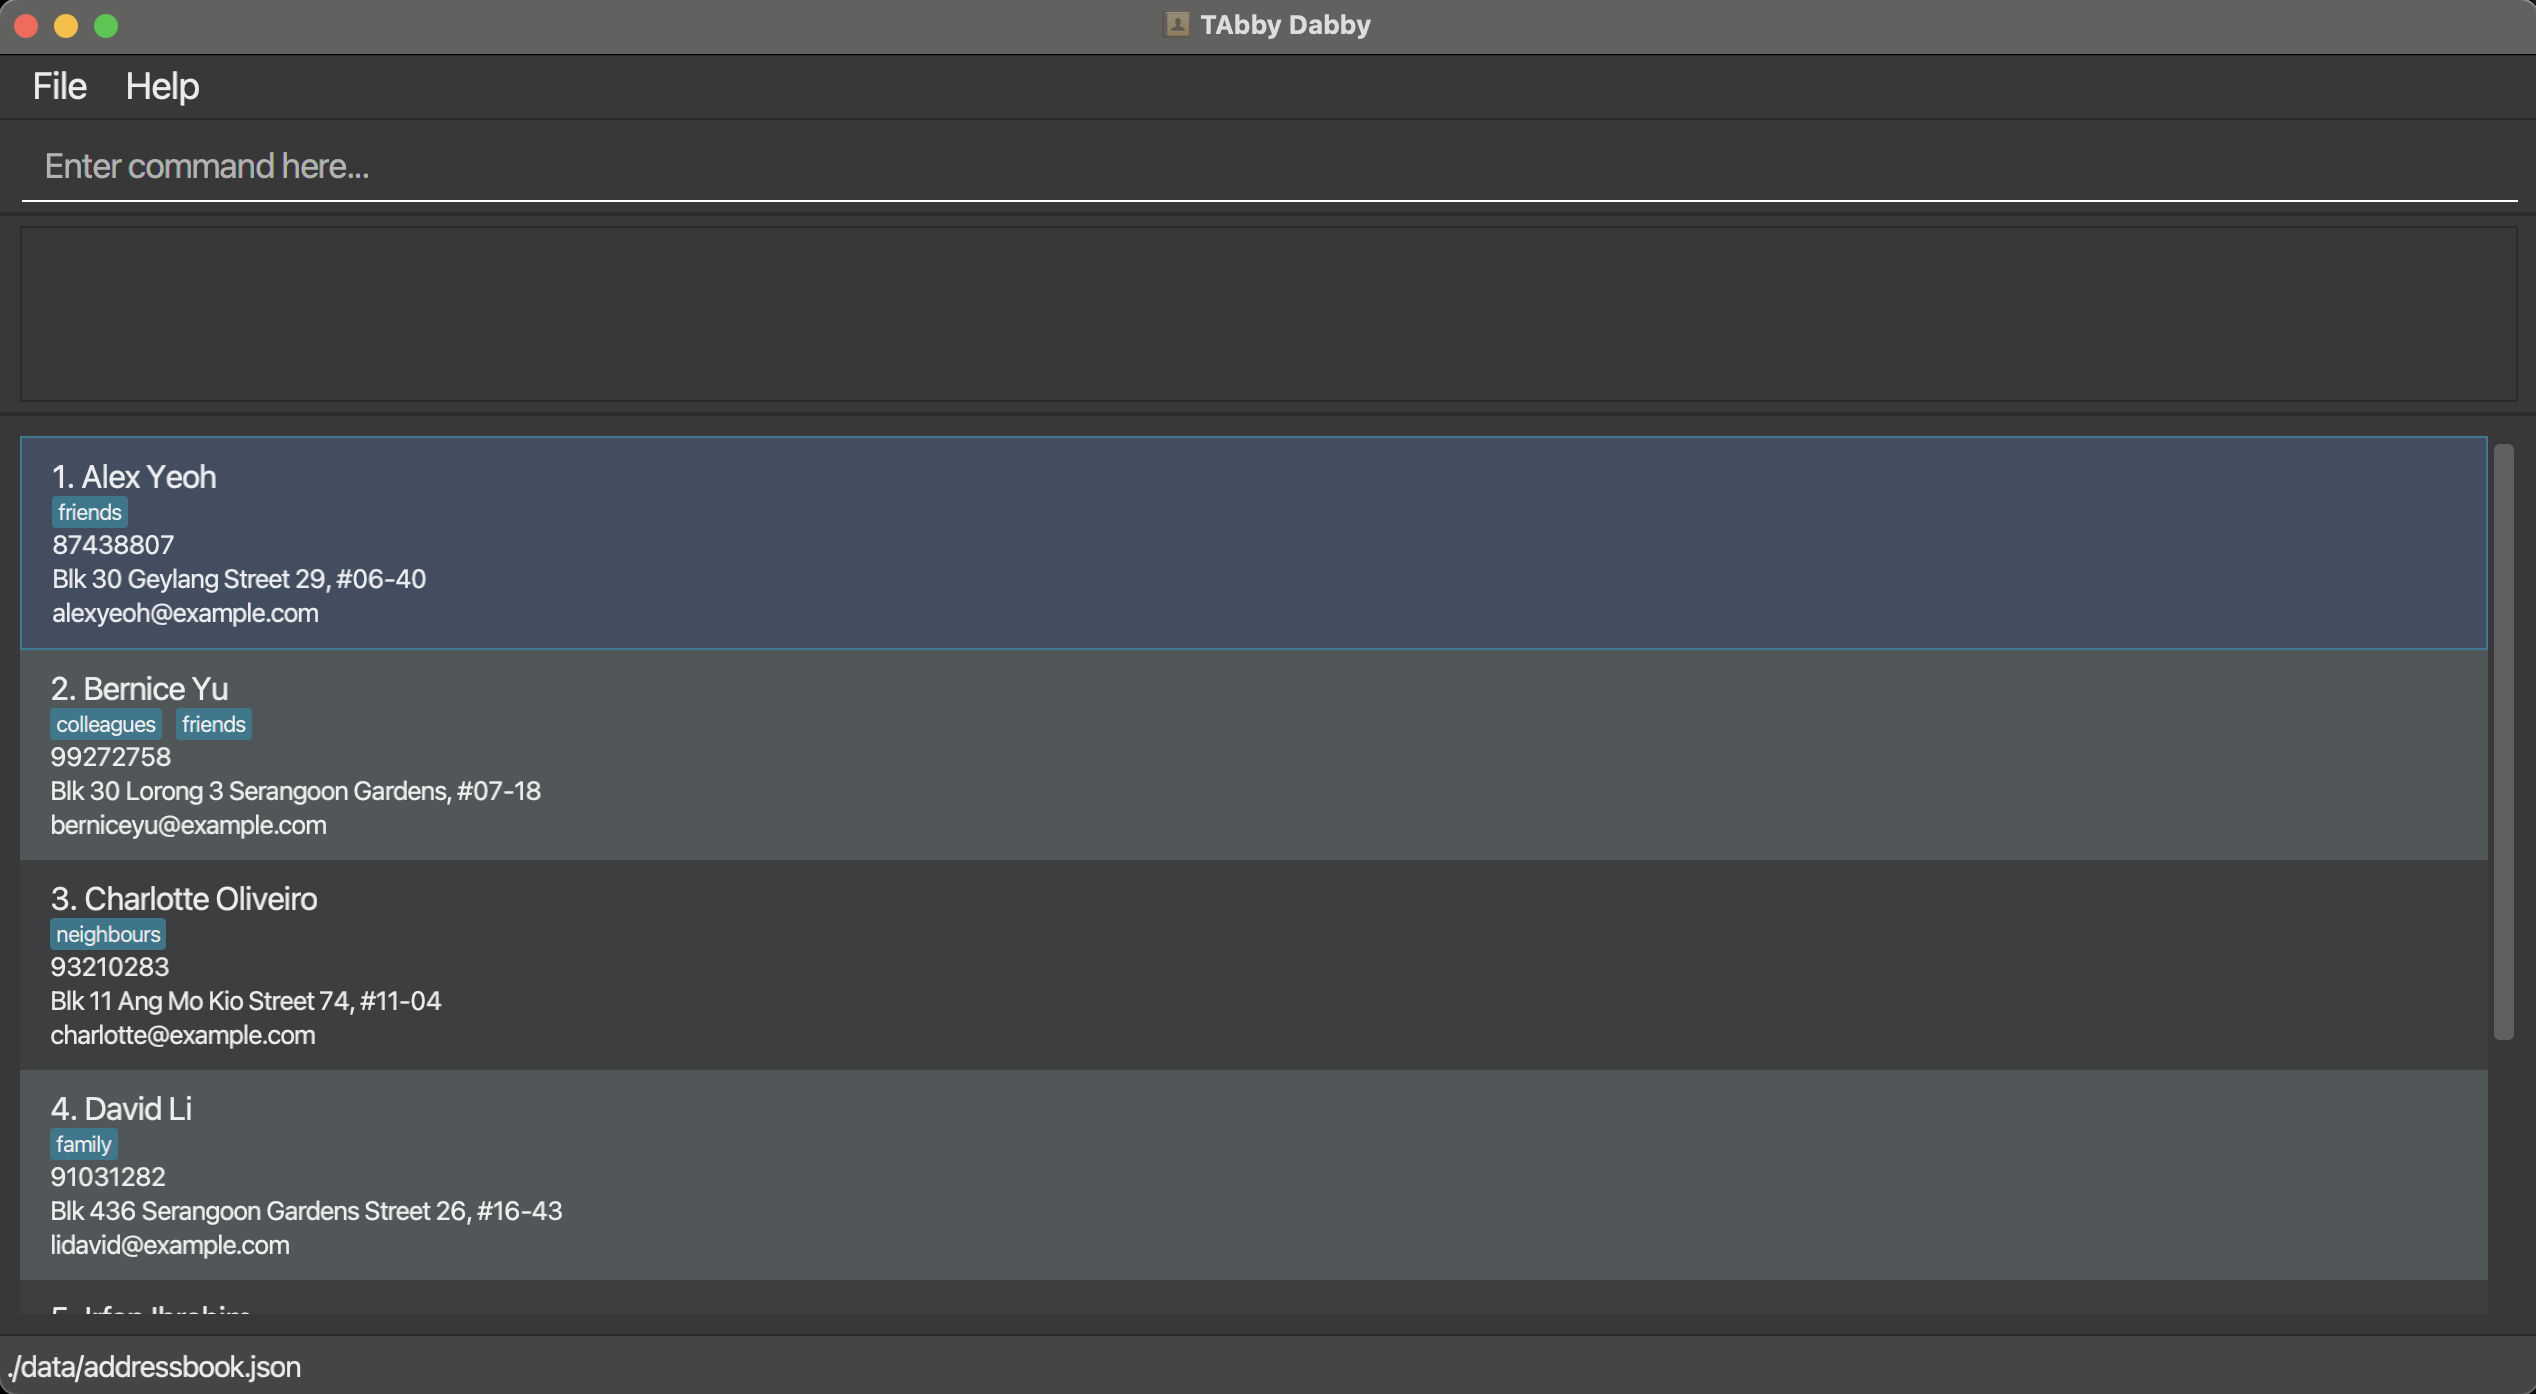
Listing all persons: list
Shows a list of all persons in the person list.
Format: list
Expected output
The GUI displays a list of all persons in the person list.
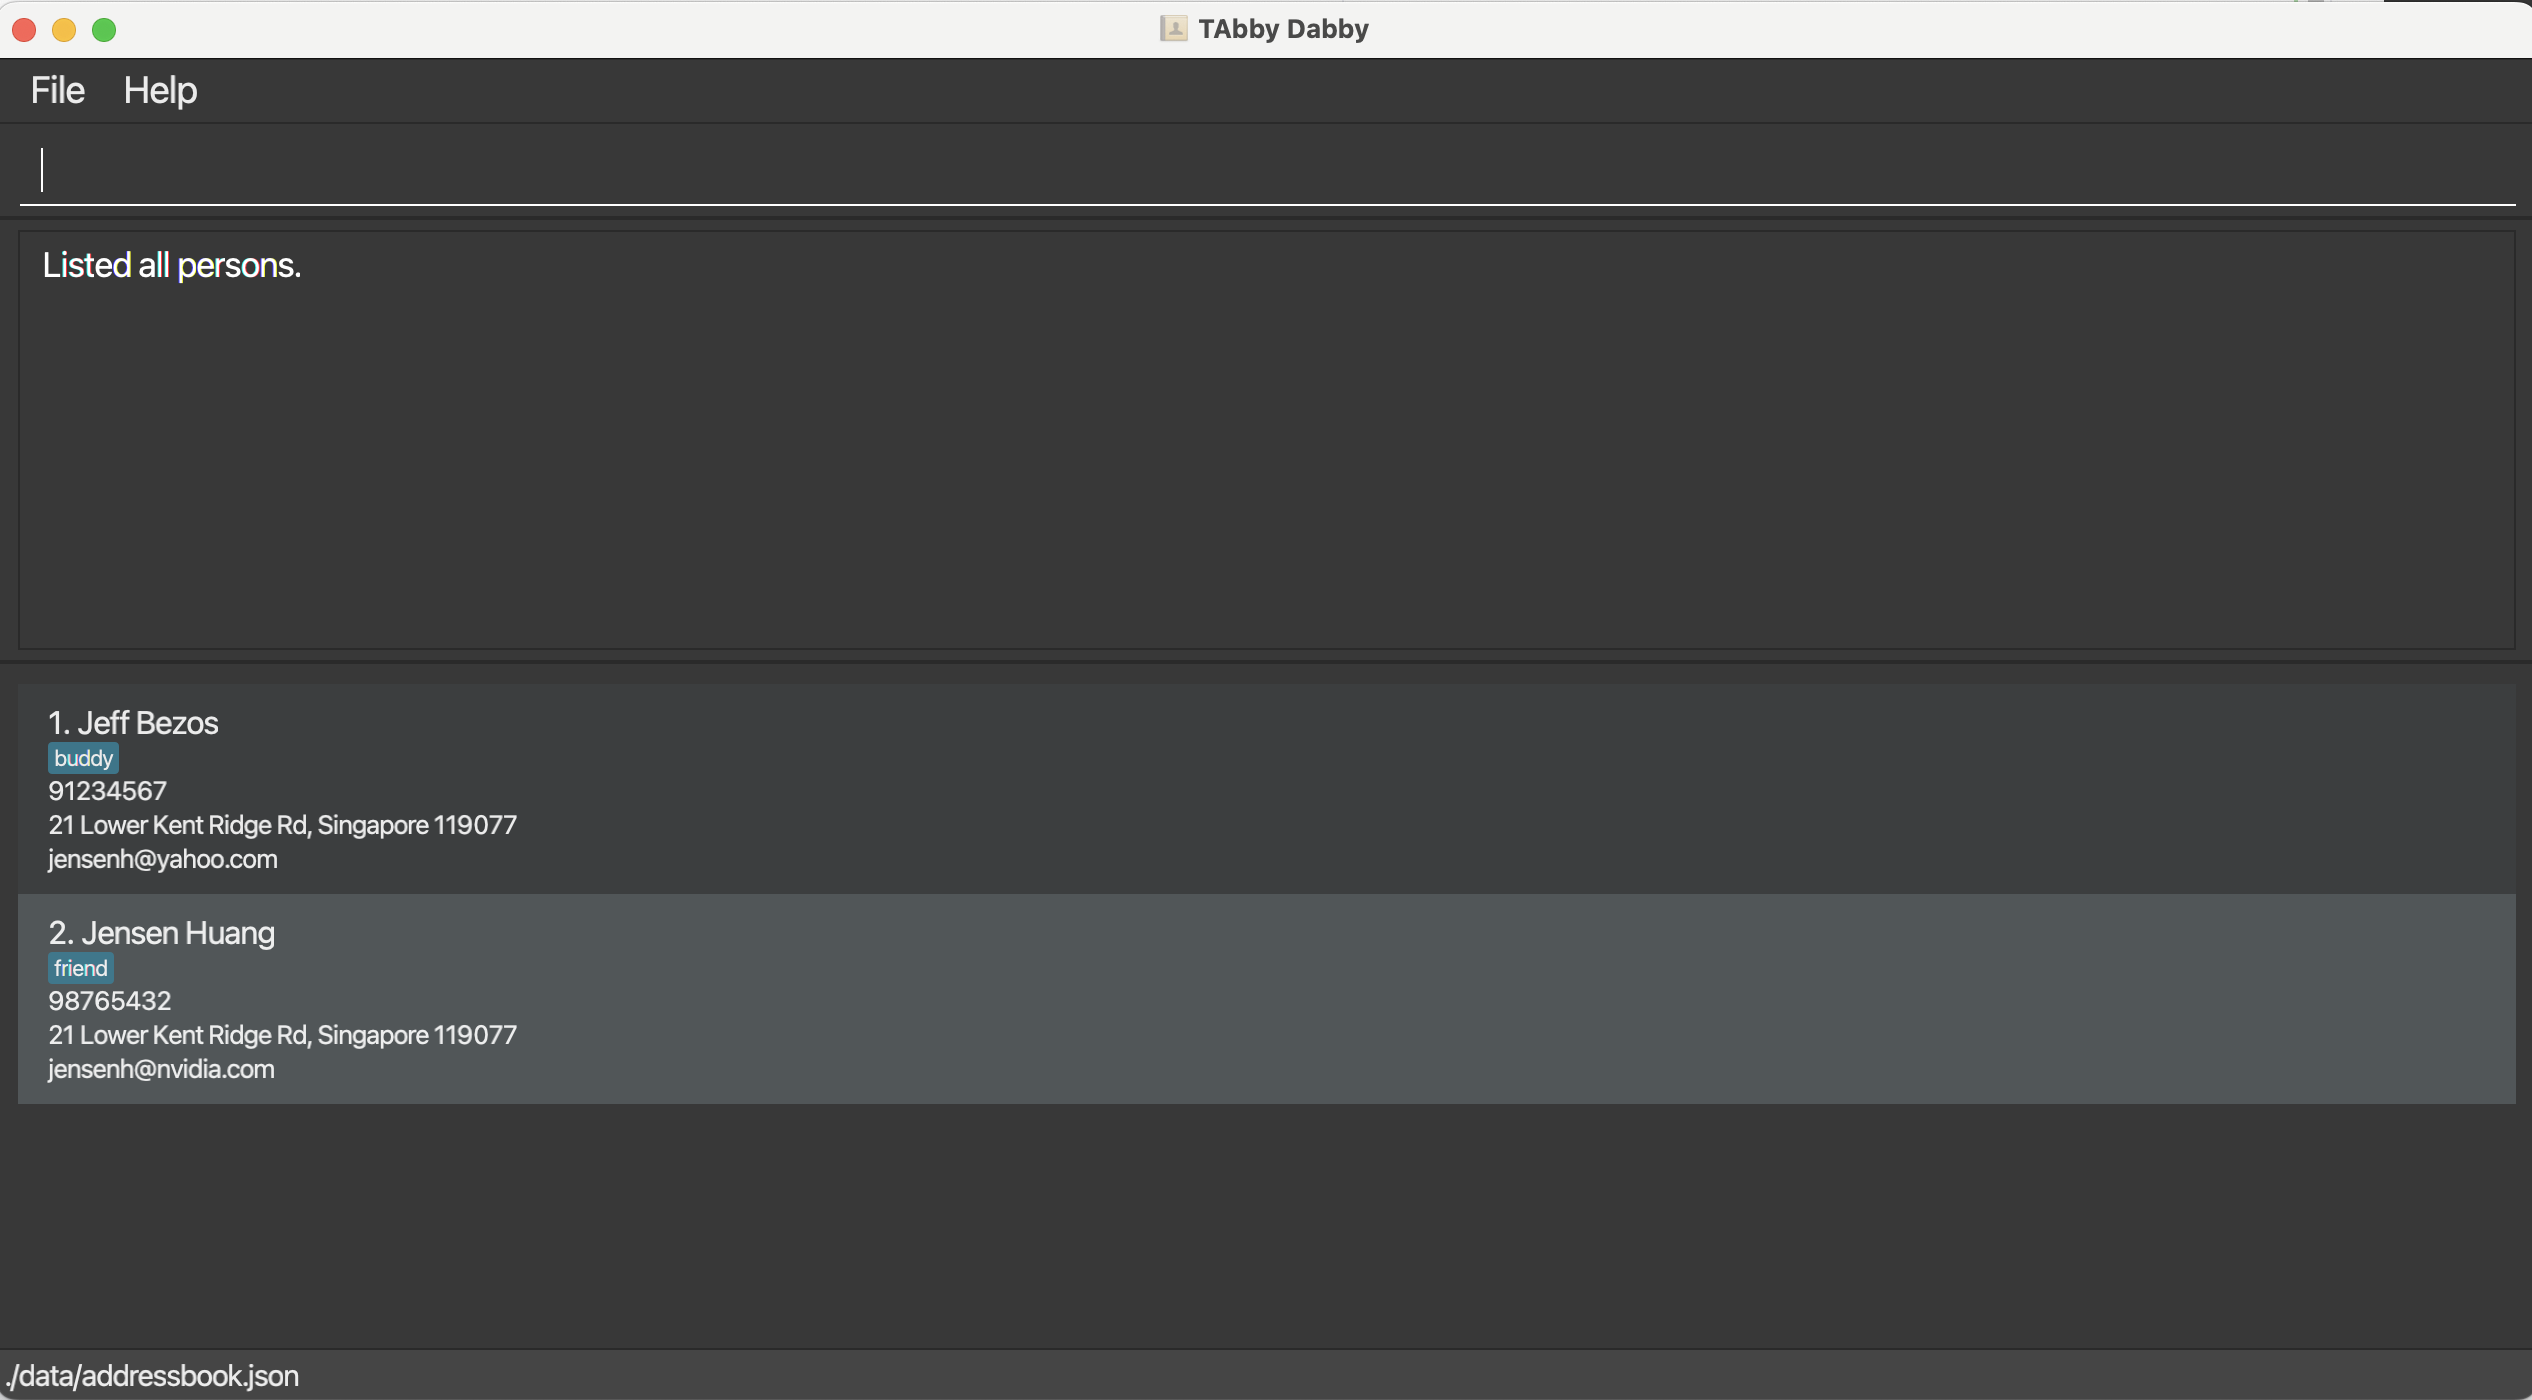
Finding persons by name: find
Finds persons whose names contain any of the specified keywords.
Format: find KEYWORD [MORE_KEYWORDS]...
Notes
- The search is case-insensitive, e.g.,
jensenwill matchJensen. - The order of the keywords does not matter. e.g.
Huang Jensenwill matchJensen Huang. - Only the name is searched.
- Only full words will be matched, e.g.,
Jenwill not matchJens. - Persons matching at least one keyword will be returned (i.e.
ORsearch), e.g.,Jensen Bezoswill returnJensen HuangandJeff Bezos.
Examples
-
find huang jensenmay outputhuang jensen,jensen huang, andJensen Huang. -
find huang bezosmay outputJensen HuangandJeff Bezos.
Expected output
The GUI displays a list of persons whose names contain any of the specified keywords.
Example result of executing the find huang bezos command:
Deleting all persons: clear
Deletes all persons from the person list.
Format: clear
Expected output
The GUI displays an empty person list.
Group commands
Adding a new group: add-group
Adds a new group to the group list. Useful for adding new tutorial groups.
Format: add-group n/GROUP_NAME [t/TAG]...
Examples
-
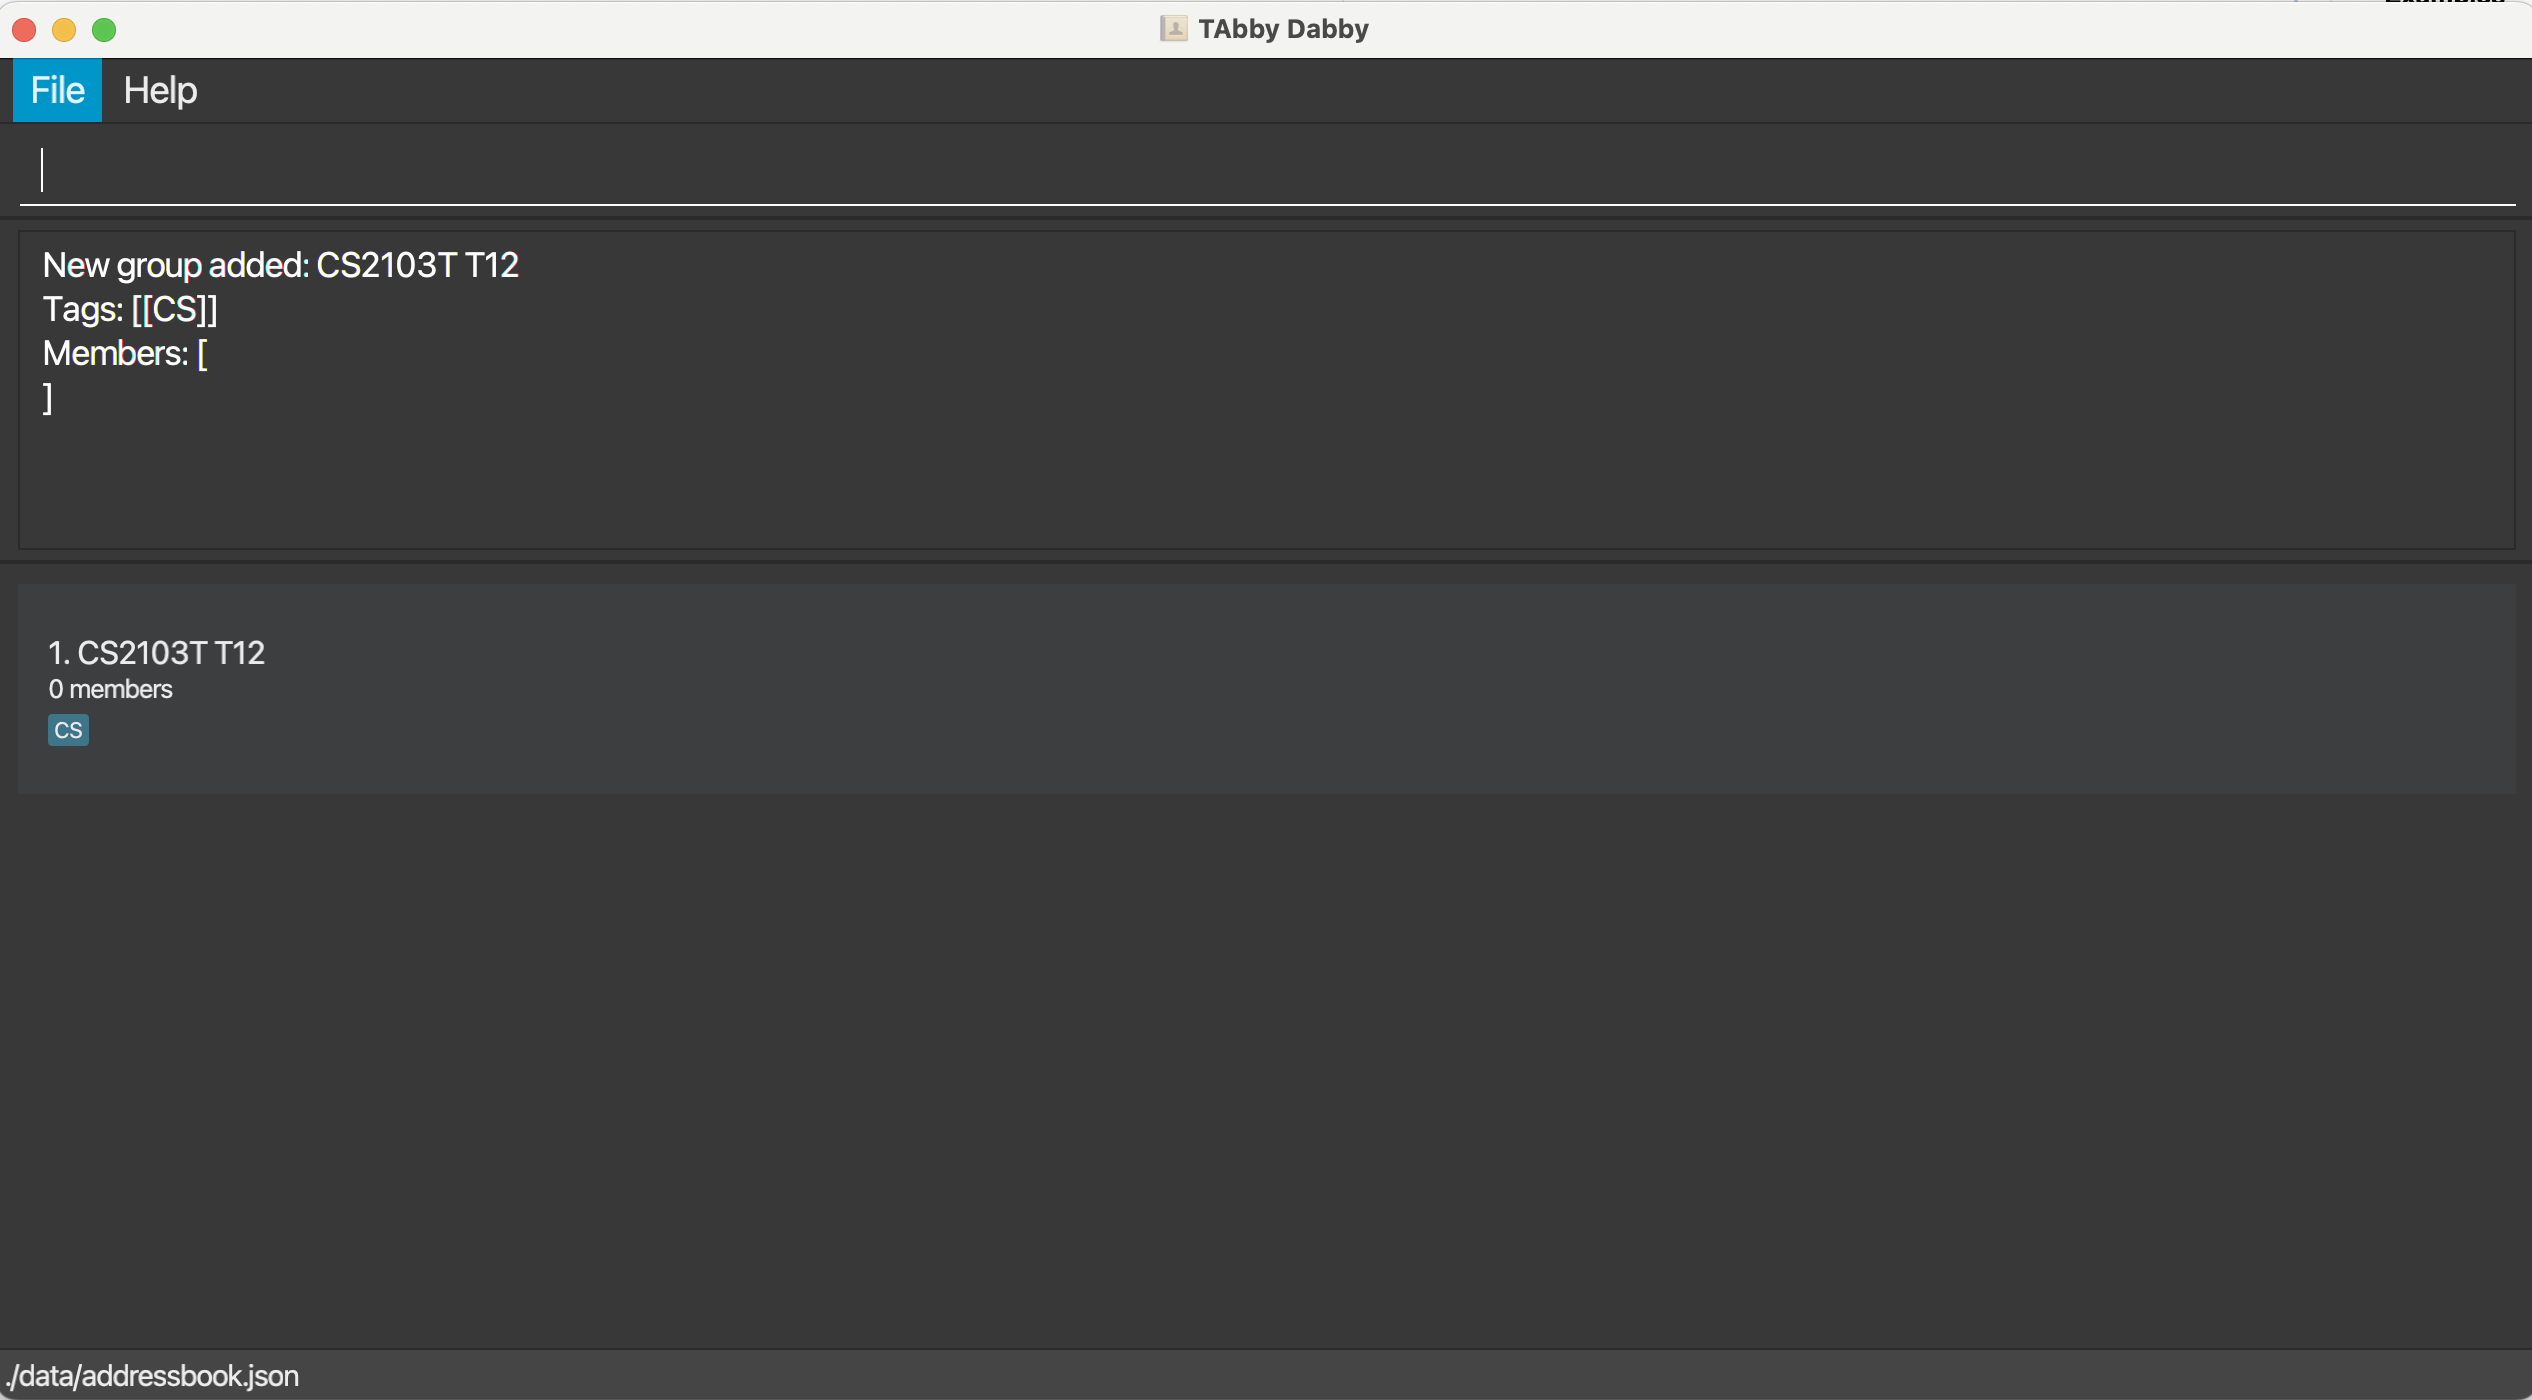
add-group n/CS2103T T12 t/CScreates a group with nameCS2103T T12and the tagCS.
Expected output
The GUI displays the group list with the new group added to the end of it.
Example result of add-group n/CS2103T T12 t/CS:
Deleting a group: delete-group
Deletes the specified group from the group list. Useful for removing a tutorial group that is no longer needed.
Format: delete-group INDEX
Examples
-
delete-group 2deletes the group with index2in the last shown group list.
Expected output
The GUI displays the group list, but with the specified group removed from it. See add-group for a similar example of the expected output.
Editing a group: edit-group
Edits the specified group details in the group list.
Format: edit-group INDEX [n/GROUP_NAME] [t/TAG]…
Notes
- At least one of the optional fields must be provided.
- Existing values will be updated to the input values.
- When editing tags, the existing tags of the group will be removed, e.g., if the group at index
2currently has the taggaming, and we run the commandedit-group 2 t/study, the taggamingwill be removed, and a new tagstudywill be added. - You can remove all the group’s tags by typing
t/without specifying any tags after it.
Examples
-
edit-group 1 n/CS2103T T12Edits the name of the first group to beCS2103T T12. -
edit-group 2 n/CS2103T T12 t/Edits the name of the second group to beCS2103T T12and clears all existing tags. -
edit-group 2 n/CS2103T T12 t/study t/friendsEdits the name of the second group to beCS2103T T12, clears all existing tags, and adds the tagsstudyandfriends.
Expected output
The GUI displays the specified group’s updated details. See show-group-details for a similar example of the expected output.
Note: this differs from the output of the analogous edit command for persons, which displays the person list instead.
Example result of edit-group 1 n/CS2103T T12 t/study t/friends:
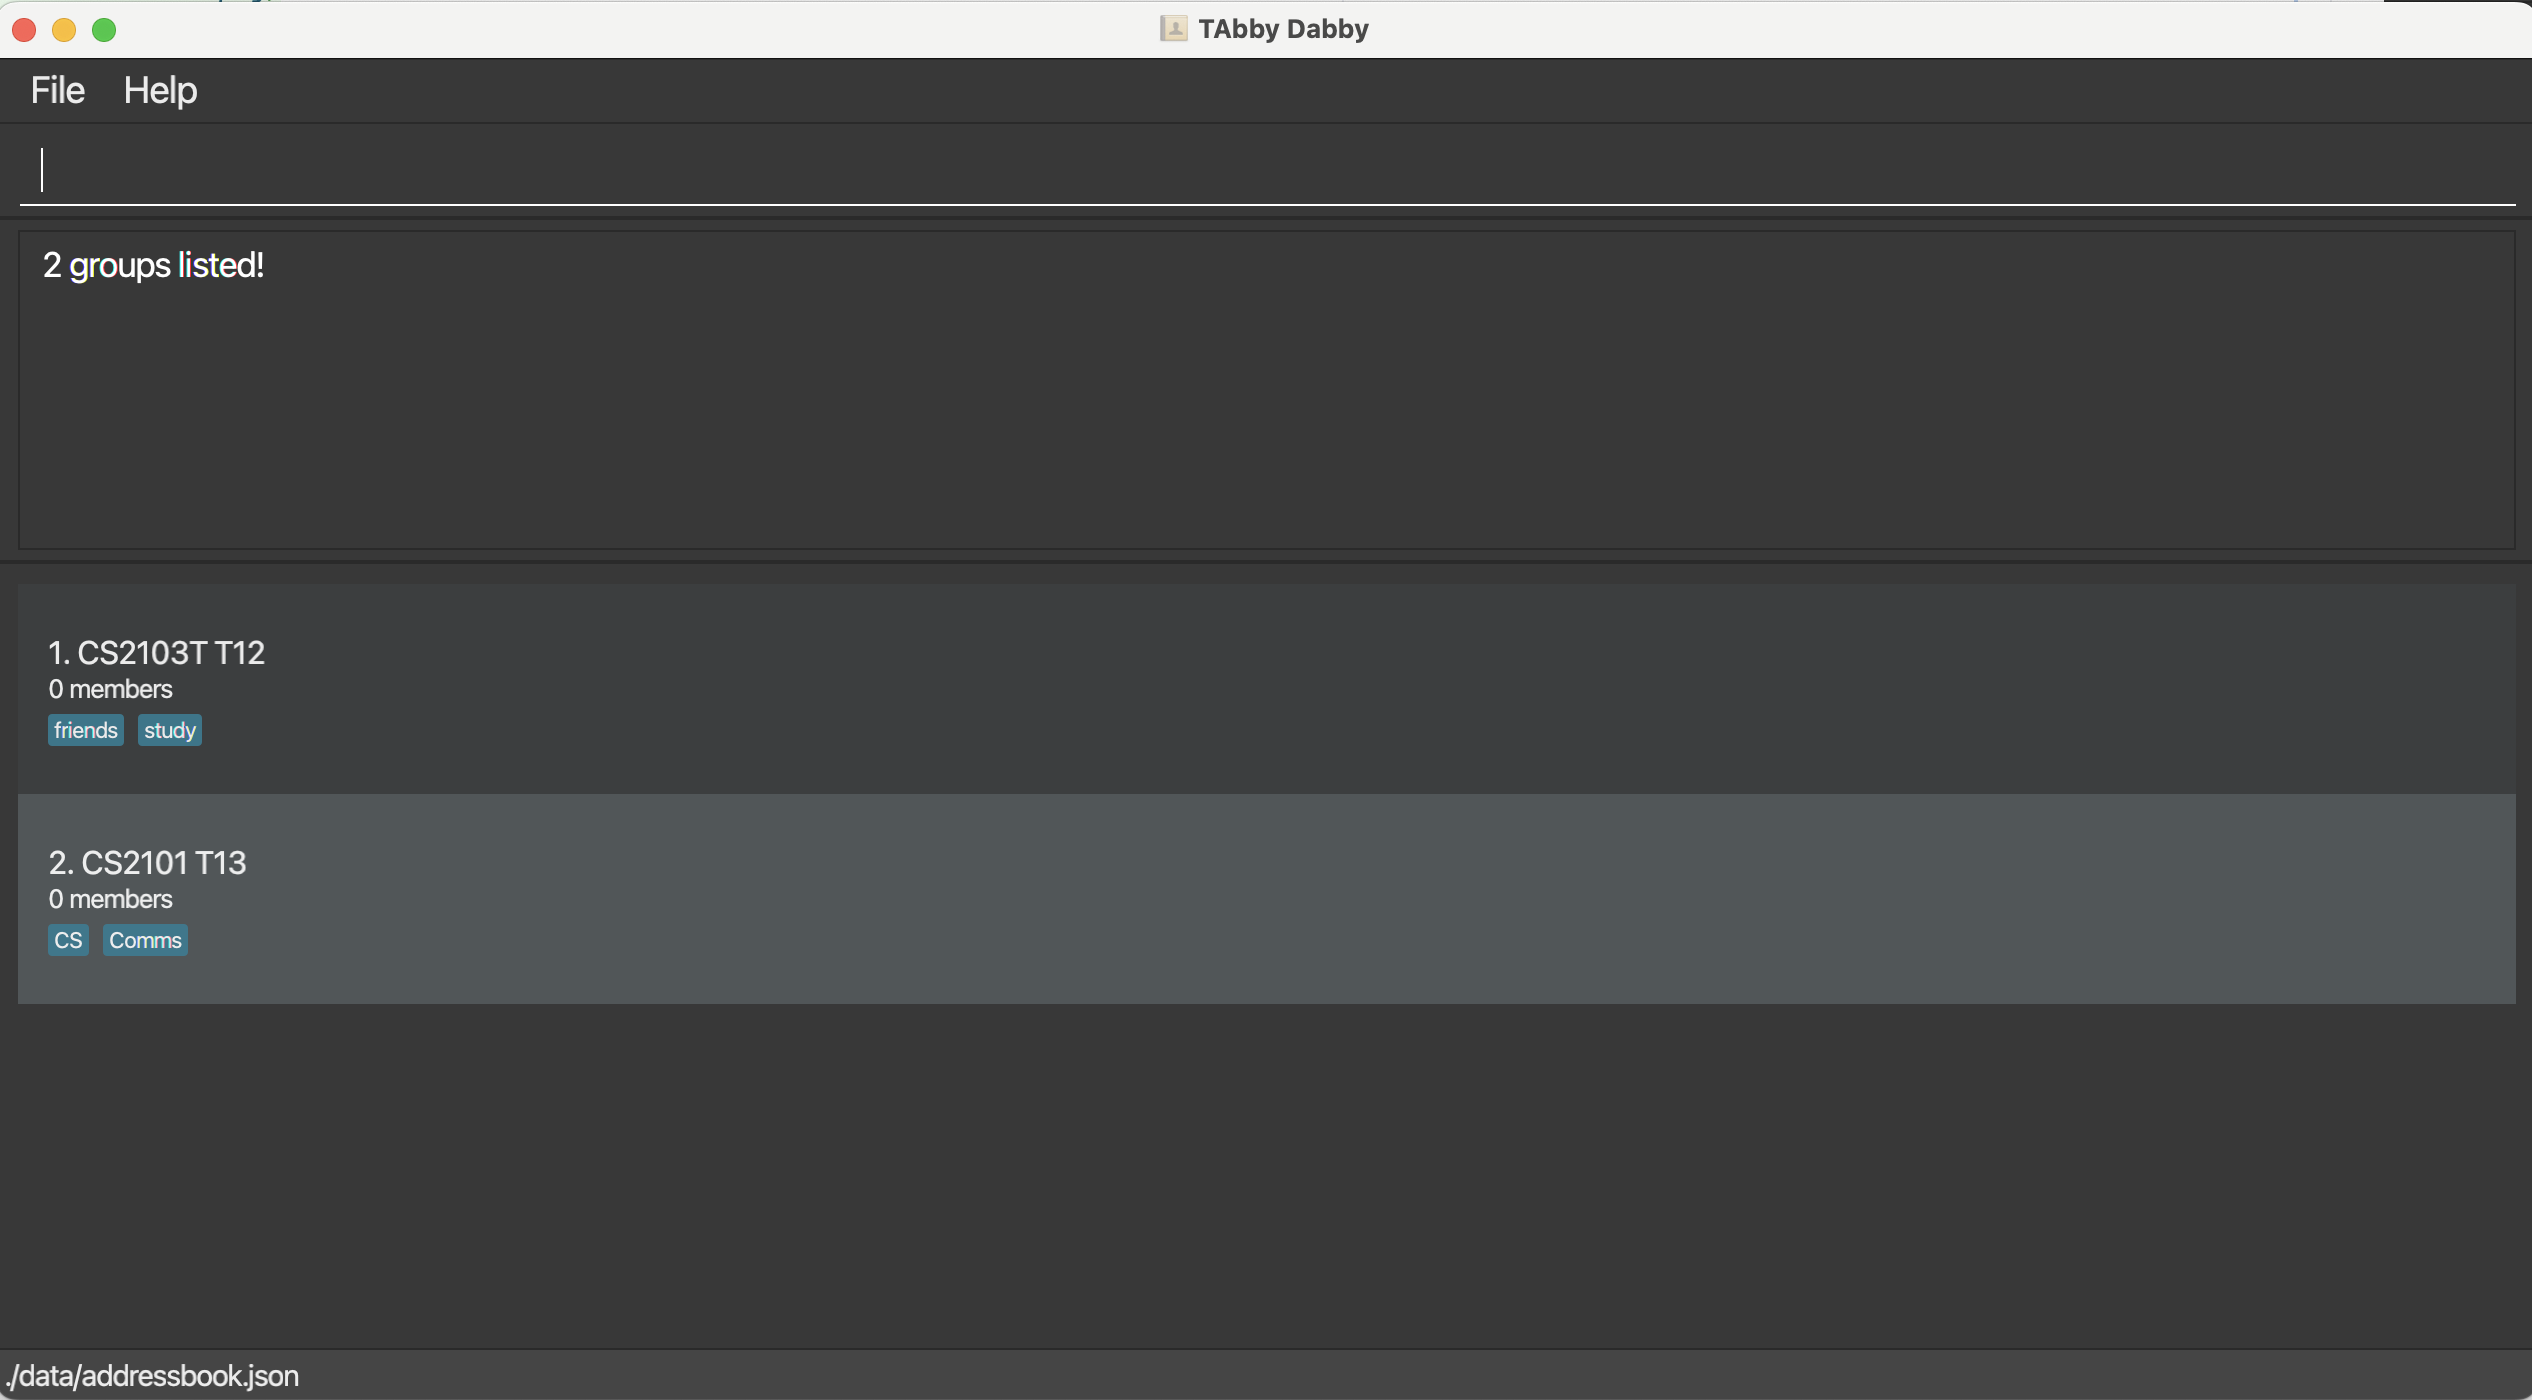
Listing all groups: list-group
Shows a list of all groups in the group list along with their information, e.g., indices and names.
Format: list-group
Expected output
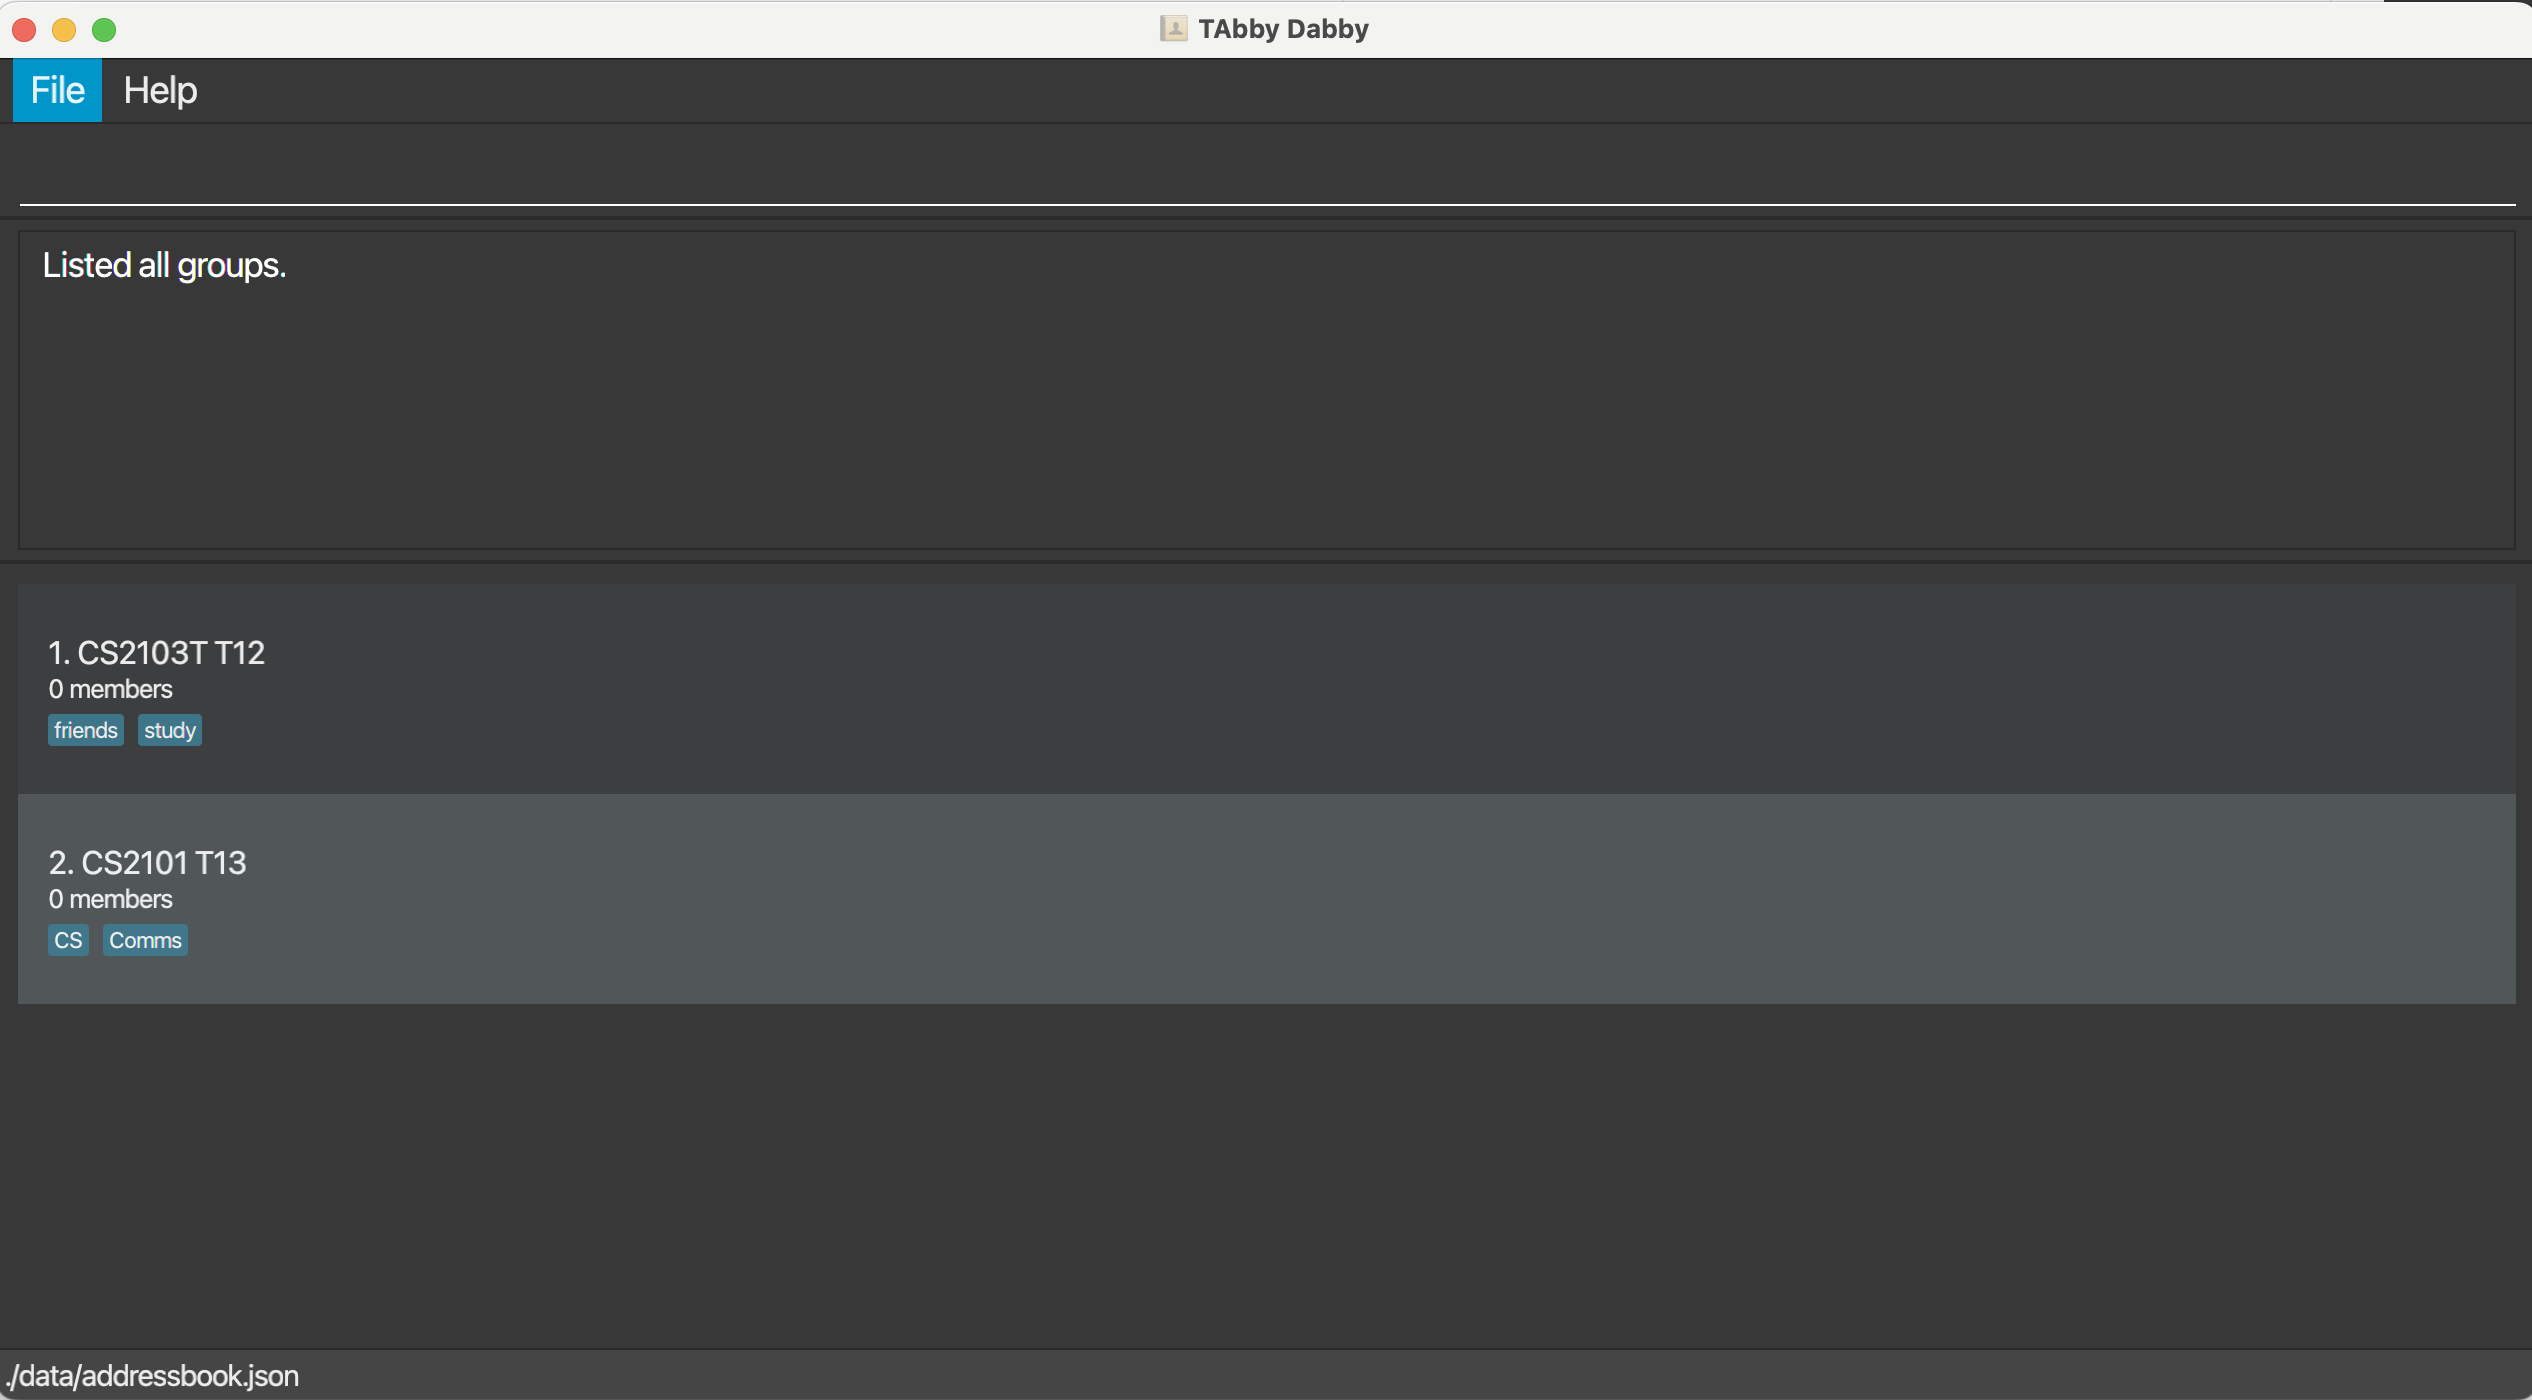
The GUI displays a list of all groups in the group list.
Example result of list-group:
Finding a group by name: find-group
Finds groups whose names contain any of the given keywords.
Format: find-group KEYWORD [MORE_KEYWORDS]
Notes
- The search is case-insensitive, e.g.,
cs2103t t12will matchCS2103T T12. - The order of the keywords does not matter. e.g.
T12 CS2103Twill matchCS2103T T12. - Only the name is searched.
- Only full words will be matched, e.g.,
CS210will not matchCS2103T. - Groups matching at least one keyword will be returned (i.e.
ORsearch), e.g.,CS2103T T13will returnCS2103T T12andCS2101 T13.
Examples
-
find-group T12may outputT12,t12, andCS2103T T12. -
find-group t12 t13may outputCS2103T T12andCS2103T T13.
Expected output
The GUI displays a list of groups whose names contain any of the specified keywords.
Example result of executing the find-group t12 t13 command:
Adding a person to a group: add-to-group
Adds the specified person to the specified group.
Format: add-to-group n/PERSON_NAME g/GROUP_NAME
Examples
-
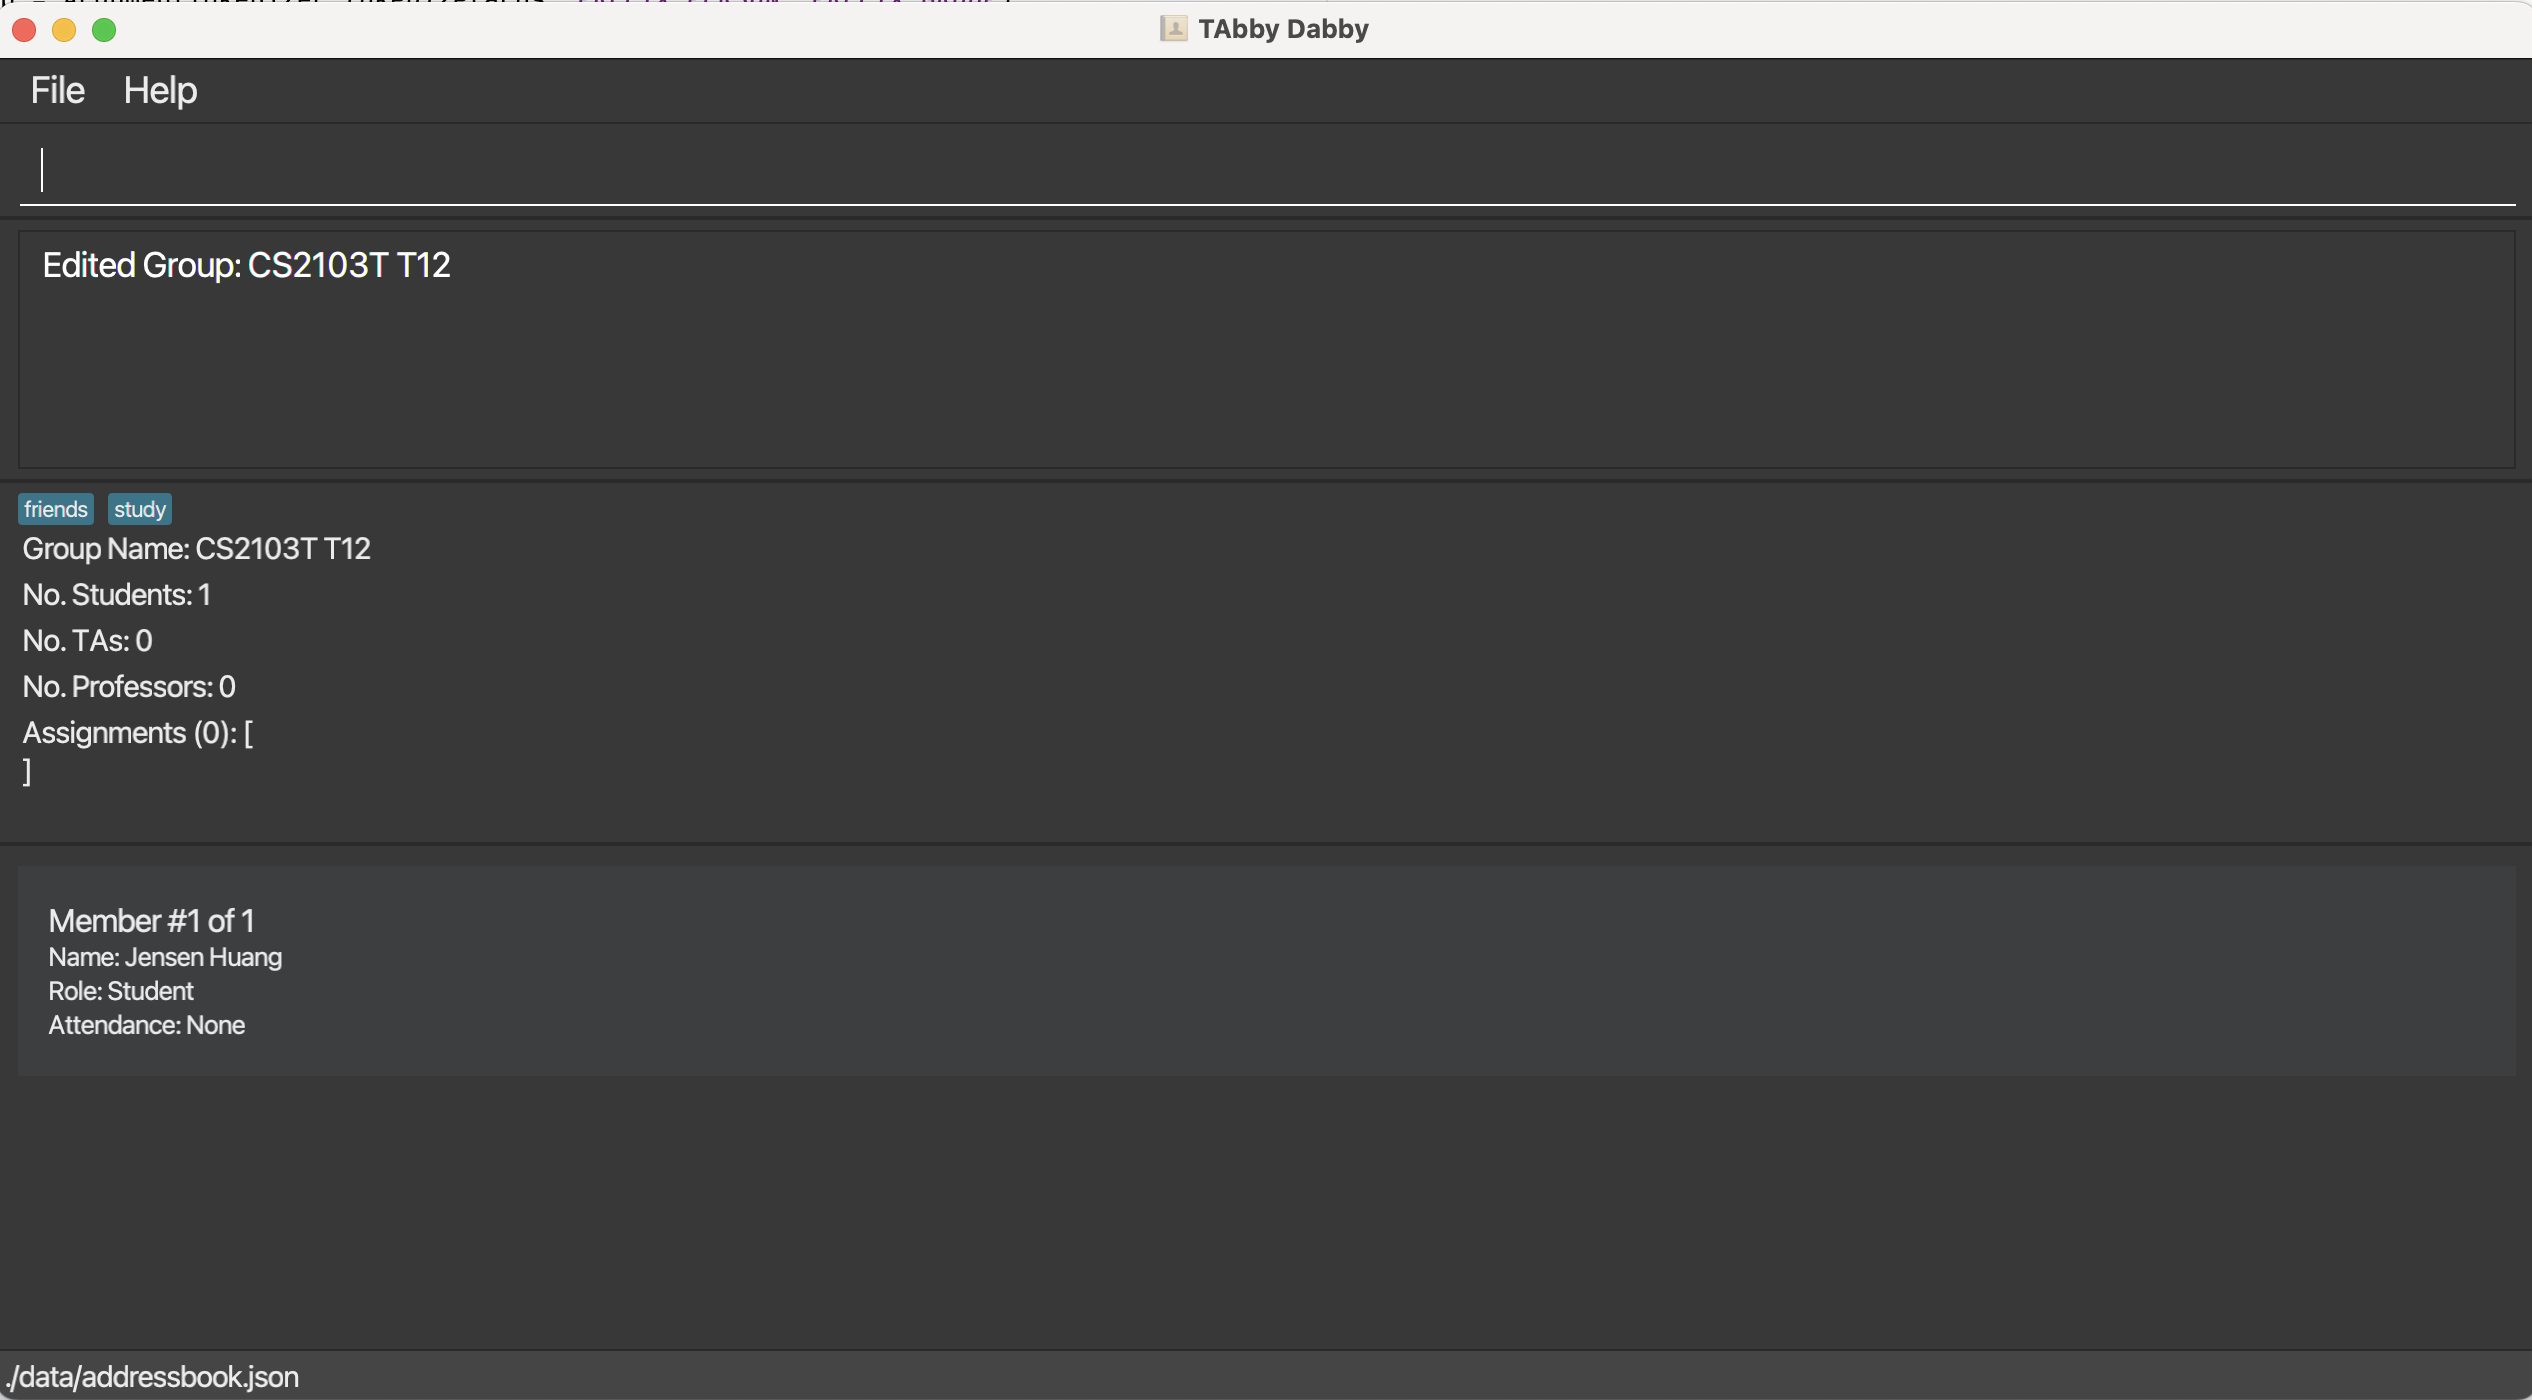
add-to-group n/Jensen Huang g/CS2103T T12adds the person namedJensen Huangto the group namedCS2103T T12.
Expected output
The GUI displays the specified group’s updated details with the specified person added to it.
Example result of add-to-group n/Jensen Huang g/CS2103T T12:
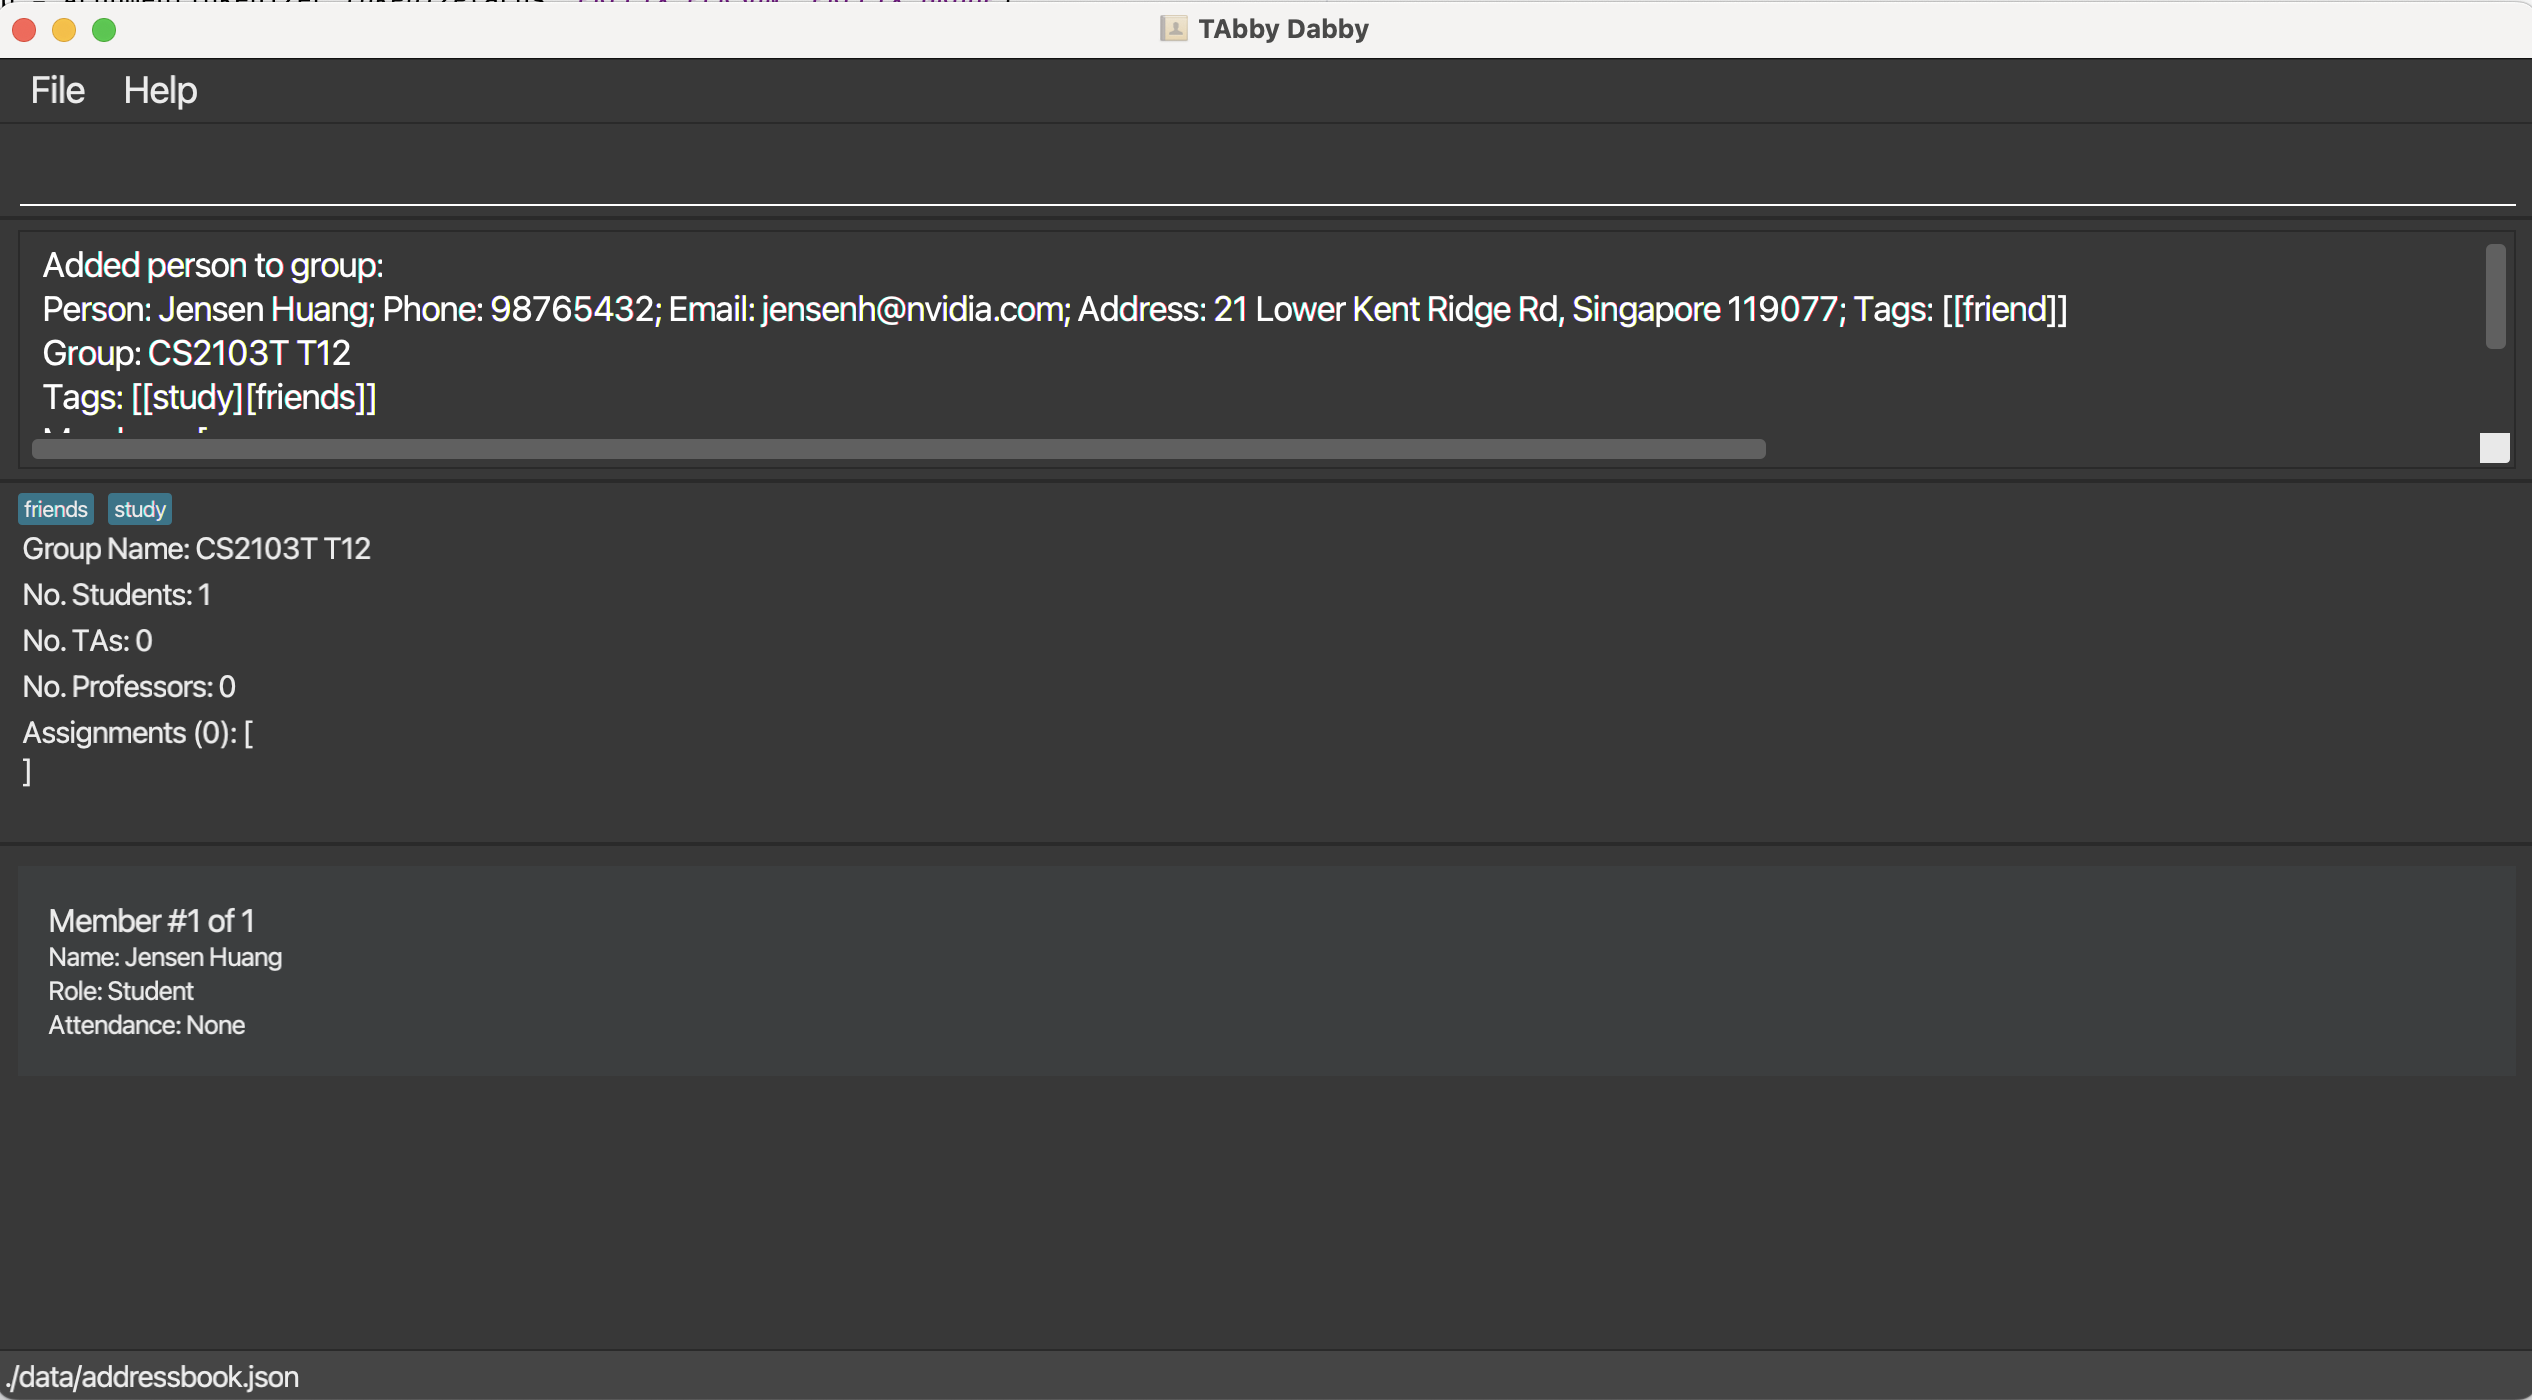
Known limitations
- The person is assumed to be a student for now. We plan to support the addition of co-TAs and lecturers in the future.
Removing a person from a group: delete-from-group
Removes the specified person from the specified group.
Format: delete-from-group n/PERSON_NAME g/GROUP_NAME
Examples
-
delete-from-group n/Jensen Huang g/CS2103T T12removes the person namedJensen Huangfrom the group namedCS2103T T12.
Expected output
The GUI displays the specified group’s updated details with the specified person removed from it. See add-to-group for a similar example of the expected output.
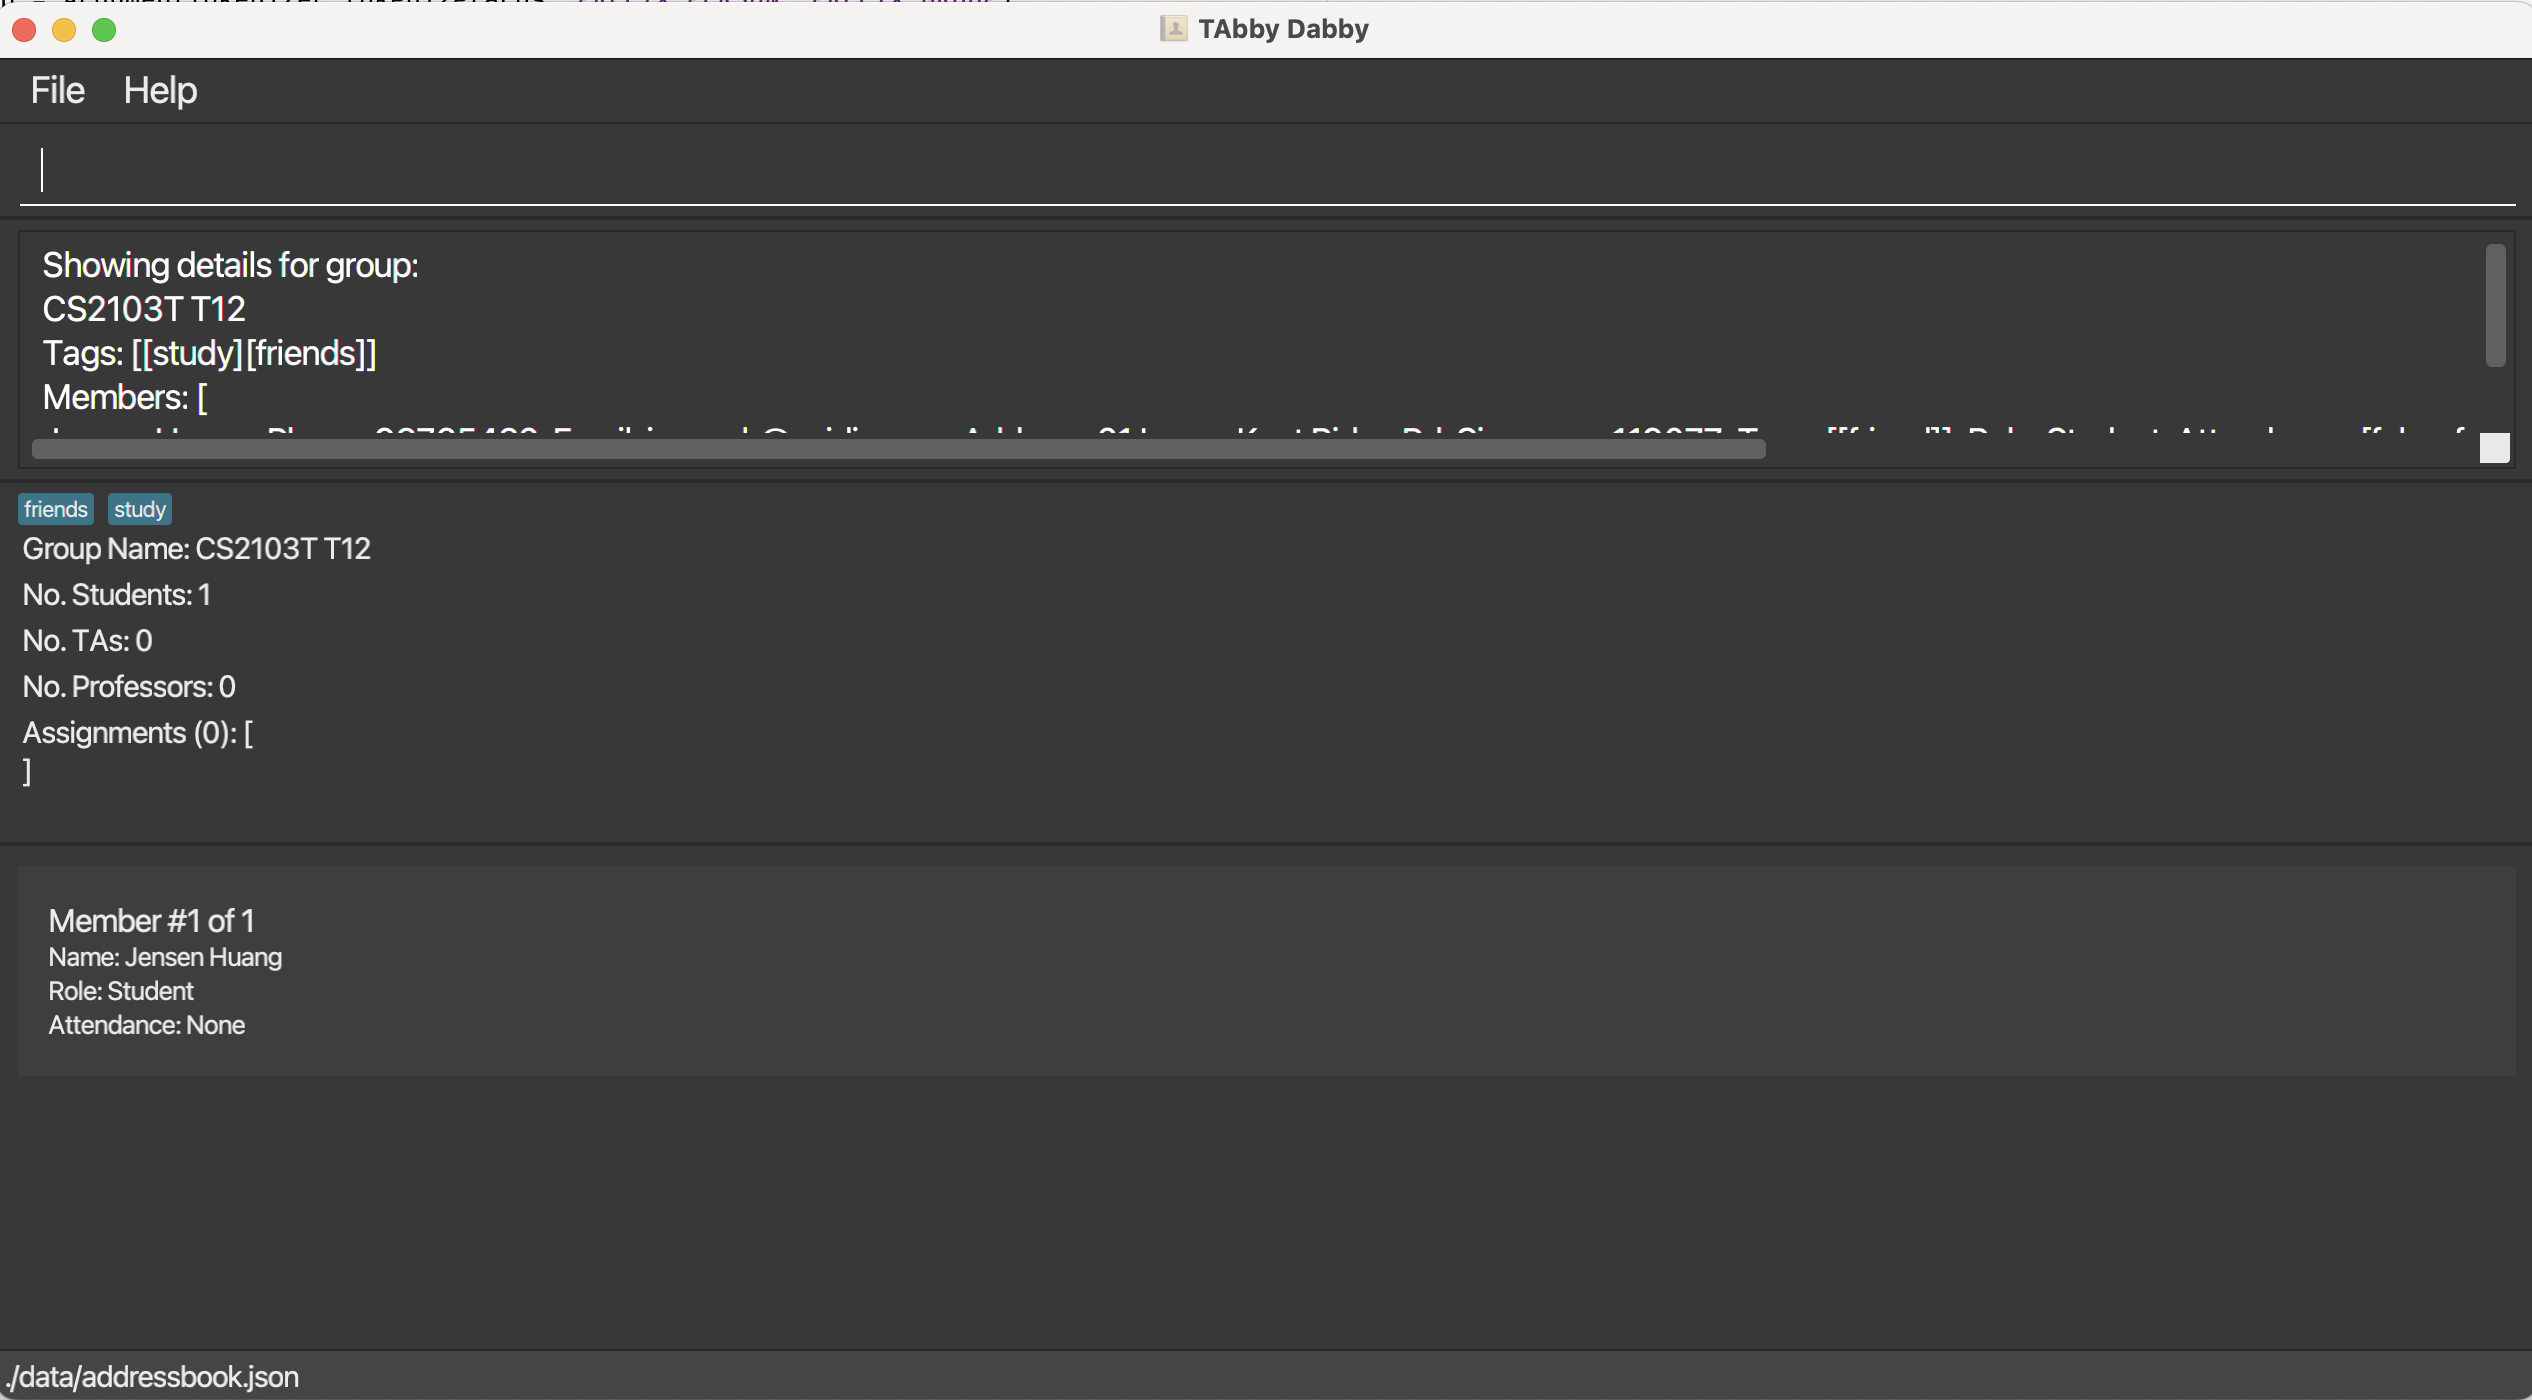
Showing group details: show-group-details
Shows the key details regarding the specified group.
Format: show-group-details INDEX
Examples
-
show-group-details 2shows all the details of the group with index2in the last shown group list.
Expected output
The GUI shows the details of the specified group, including:
- Group name and tags
- Number of students, TAs, lecturers, and assignments
- Name, role, and attendance of every group member
Example result of show-group-details 1:
Attendance commands
Marking the attendance of a person: mark-attendance
Marks the attendance of the specified person in the specified group for the specified week.
Format: mark-attendance n/PERSON_NAME g/GROUP_NAME w/WEEK_NUMBER
Notes
-
WEEK_NUMBERmust be a positive integer between 1 and 13 (inclusive).
Examples
-
mark-attendance n/Jensen Huang g/CS2103T T12 w/10marks the attendance forJensen HuanginCS2103T T12for week10.
Expected output
The GUI displays the specified group’s updated details with the specified person’s attendance marked for the specified week. See show-group-details for a similar example of the expected output.
Unmarking the attendance of a person: unmark-attendance
Removes the attendance record of the specified person in the specified group for the specified week.
Format: unmark-attendance n/PERSON_NAME g/GROUP_NAME w/WEEK_NUMBER
Notes
-
WEEK_NUMBERmust be a positive integer between 1 and 13 (inclusive).
Examples
-
unmark-attendance n/Jensen Huang g/CS2103T T12 w/10unmarks the attendance forJensen HuanginCS2103T T12for week10.
Expected output
The GUI displays the specified group’s updated details with the specified person’s attendance unmarked for the specified week. See show-group-details for a similar example of the expected output.
Showing the attendance records for a person: show-attendance
Displays the attendance record of the specified person in the specified group.
Format: show-attendance n/PERSON_NAME g/GROUP_NAME
Examples
-
show-attendance n/Jensen Huang g/CS2103T T12displays the attendance forJensen HuanginCS2103T T12.
Expected output
The GUI displays the specified person’s attendance record for the specified group.
Example result of show-attendance n/Jensen Huang g/CS2103T T12:

Assignment commands
Adding an assignment in a group: add-assignment
Adds a new assignment in the specified group.
Format: add-assignment n/ASSIGNMENT_NAME g/GROUP_NAME d/DEADLINE
Notes
-
ASSIGNMENT_NAMEis the name of the assignment. -
GROUP_NAMEis the name of the group. -
DEADLINEis the deadline of the assignment in the formatDD-MM-YYYY.
Examples
-
add-assignment n/HW 1 g/CS2103T T12 d/21-04-2025adds an assignment namedHW 1to the groupCS2103T T12with a deadline of21-04-2025.
Expected output
The GUI displays the specified group’s updated details with the new assignment added to it.
Example result of add-assignment n/HW 1 g/CS2103T T12 d/21-04-2025:
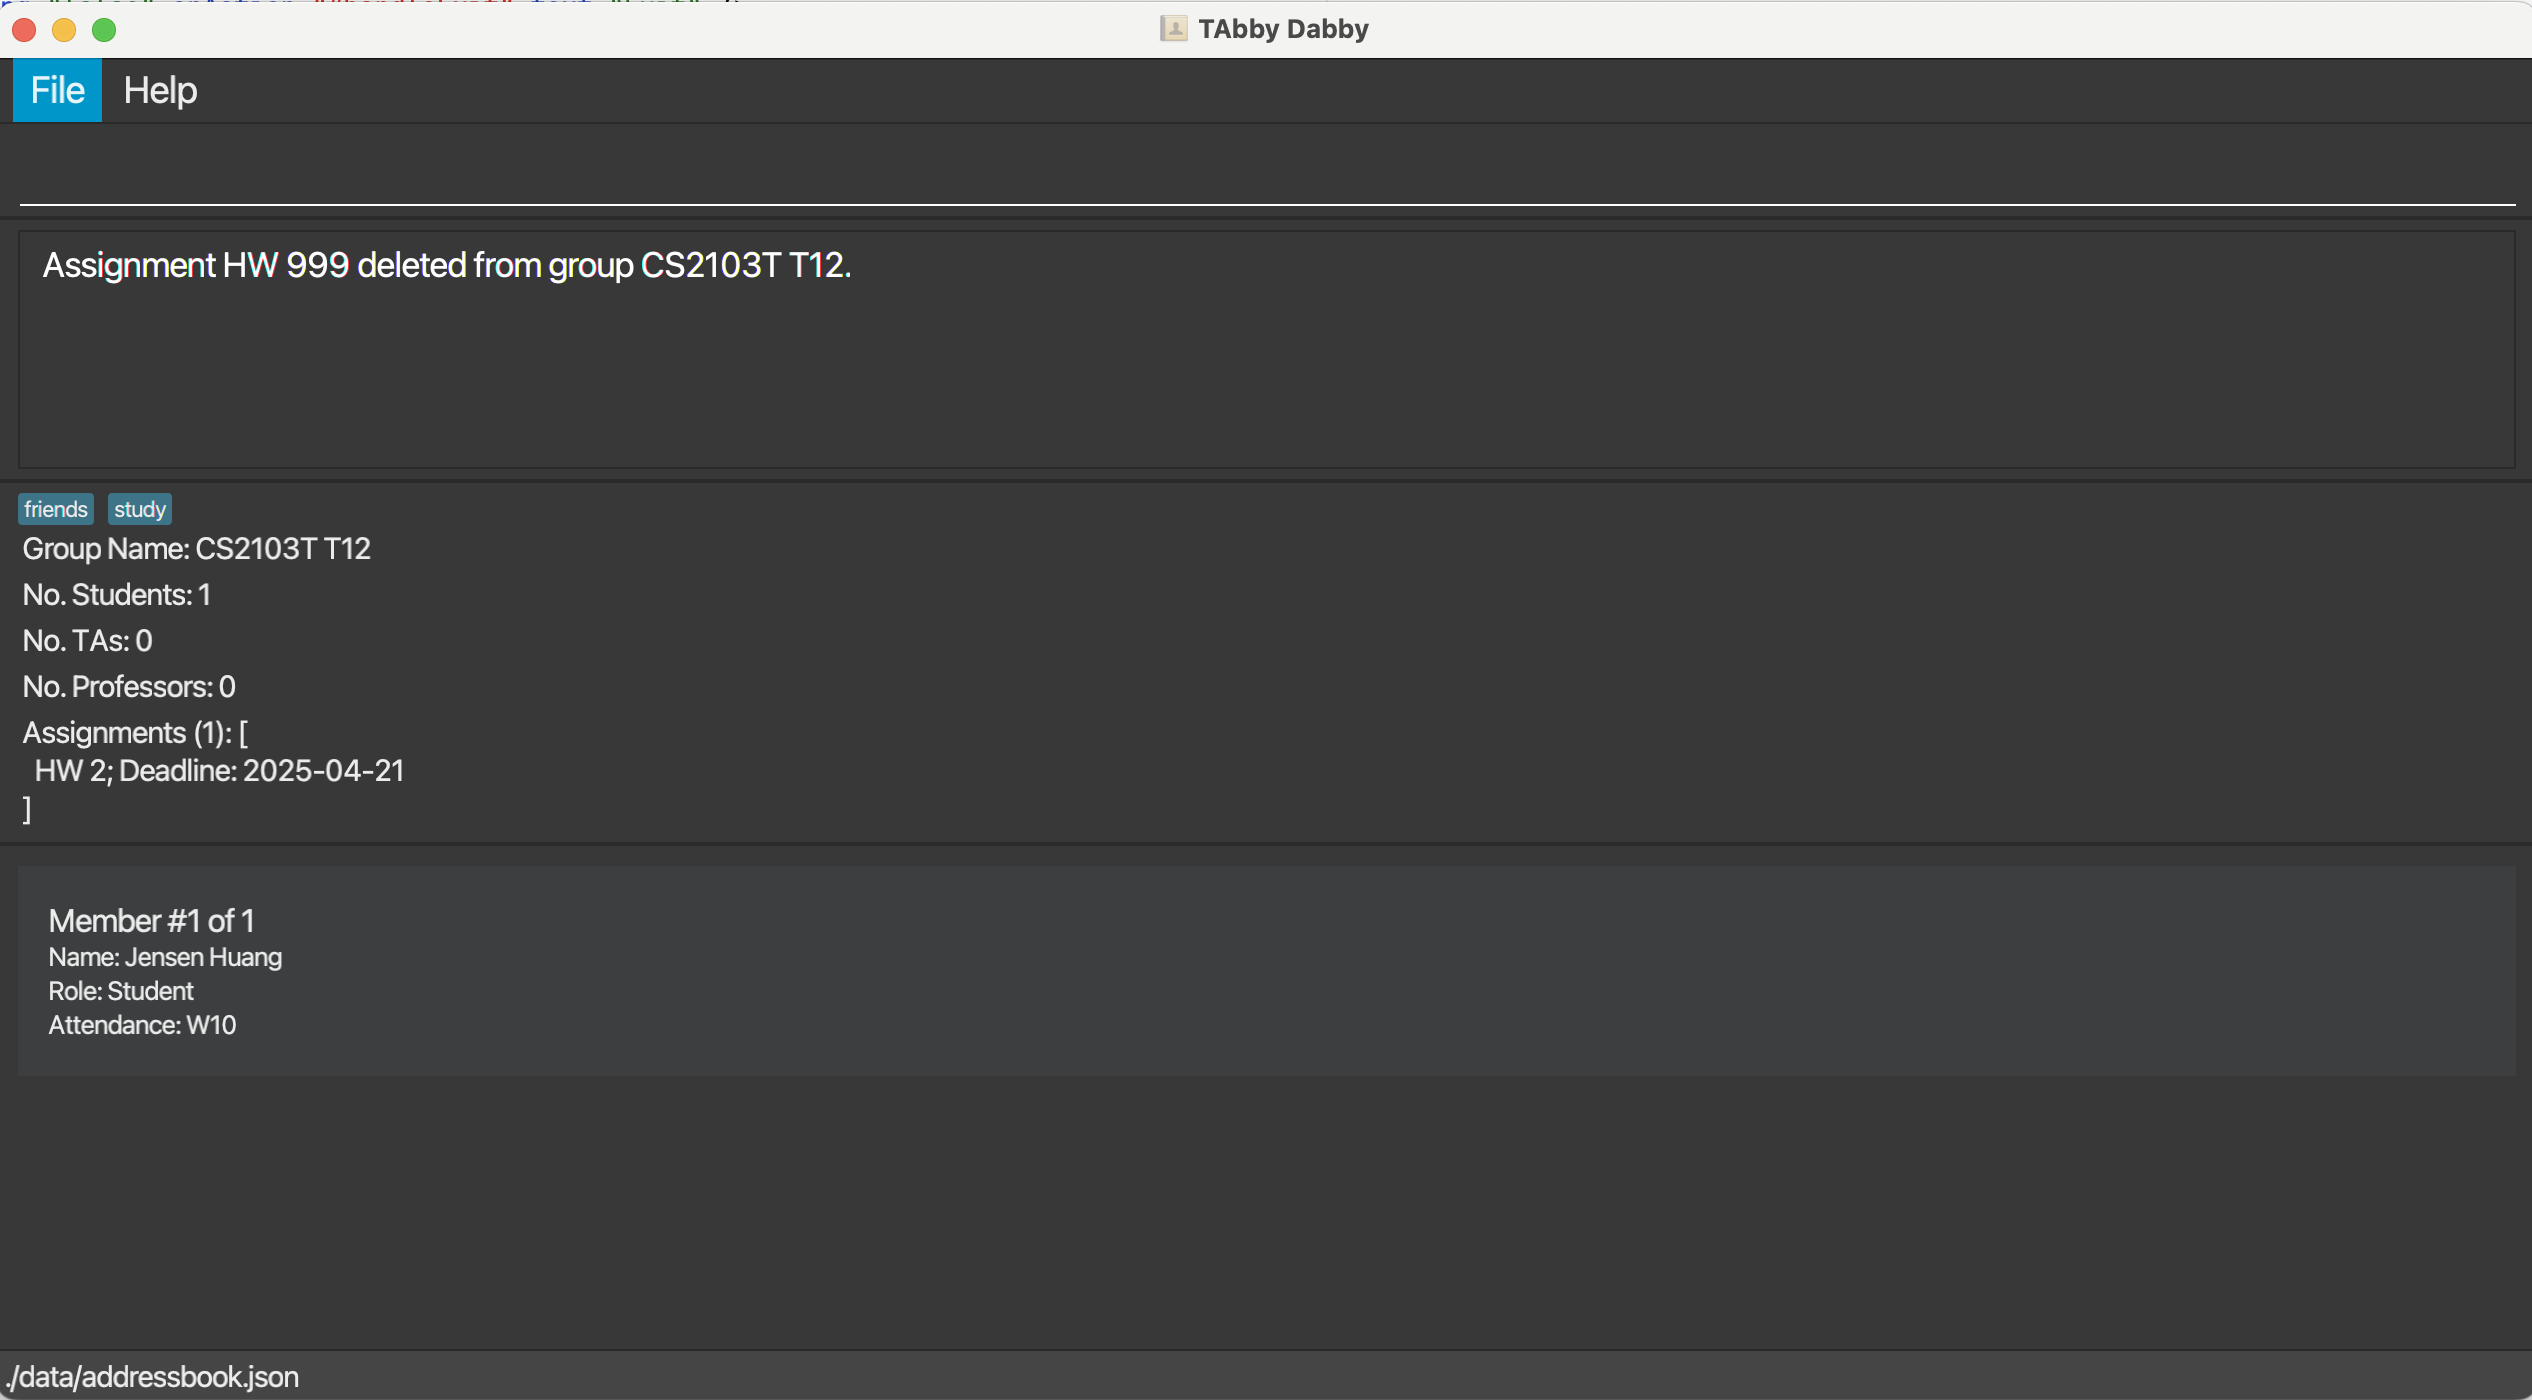
Deleting an assignment in a group: delete-assignment
Deletes an assignment in the specified group.
Format: delete-assignment n/ASSIGNMENT_NAME g/GROUP_NAME
Notes
-
ASSIGNMENT_NAMEis the name of the assignment. -
GROUP_NAMEis the name of the group.
Examples
-
delete-assignment n/HW 1 g/CS2103T T12deletes the assignment namedHW 1in the groupCS2103T T12.
Expected output
The GUI displays the specified group’s updated details with the specified assignment removed from it. See add-assignment for a similar example of the expected output.
Editing an assignment in a group: edit-assignment
Edits details of the specified assignment in the specified group.
Format: edit-assignment n/ASSIGNMENT_NAME g/GROUP [N/NEW NAME] [d/DEADLINE]
Notes
-
ASSIGNMENT_NAMEis the name of the assignment. -
GROUP_NAMEis the name of the group. -
NEW NAMEis the new name of the assignment. -
DEADLINEis the new deadline of the assignment in the formatDD-MM-YYYY.
Examples
-
edit-assignment n/HW 1 g/CS2103T T12 N/Assignment 1 d/21-04-2025renames the assignment namedHW 1in the groupCS2103T T12toAssignment 1with a deadline of21-04-2025.
Expected output
The GUI displays the specified group’s updated details with the specified assignment updated. See add-assignment for a similar example of the expected output.
Saving the data
TAbby Dabby’s data is saved in your computer’s hard disk automatically after any command that changes the data. There is no need to save manually.
Editing the data file
You can find TAbby Dabby’s data as a JSON file [JAR file location]/data/addressbook.json. Advanced users are welcome to update data directly by editing that data file.
Furthermore, certain edits can cause the TAbby Dabby to behave in unexpected ways (e.g., if a value entered is outside of the acceptable range). Therefore, edit the data file only if you are confident that you can update it correctly.
FAQ
Q: How do I transfer my data to another Computer?
A: Install the app in the other computer and overwrite the empty data file it creates with the file that contains the data of your previous TAbby Dabby home folder.
![]() Refresher: You can find the data file in TAbby Dabby’s home folder at /data/addressbook.json.
Refresher: You can find the data file in TAbby Dabby’s home folder at /data/addressbook.json.
Known issues
-
When using multiple screens, if you move the application to a secondary screen, and later switch to using only the primary screen, the GUI will open off-screen. The remedy is to delete the
preferences.jsonfile created by the application before running the application again. -
If you minimise the Help Window and then run the
helpcommand (or use theHelpmenu, or the keyboard shortcutF1) again, the original Help Window will remain minimised, and no new Help Window will appear. The remedy is to manually restore the minimised Help Window.
Command summary
| Action | Format, Examples |
|---|---|
| Help | help |
| Add |
add n/NAME p/PHONE_NUMBER e/EMAIL a/ADDRESS [t/TAG]… e.g. add n/Jensen Huang p/98765432 e/jensenh@nvidia.com a/21 Lower Kent Ridge Rd, Singapore 119077
|
| Delete |
delete INDEXe.g. delete 3
|
| Edit |
edit INDEX [n/NAME] [p/PHONE_NUMBER] [e/EMAIL] [a/ADDRESS] [t/TAG]…e.g. edit 2 n/Jensen Huang e/jensenh@yahoo.com
|
| List | list |
| Find |
find KEYWORD [MORE_KEYWORDS]e.g. find huang jensen
|
| Clear | clear |
| Add Group |
add-group n/GROUP_NAME e.g. add-group n/CS2103T T12
|
| Delete Group |
delete-group INDEX e.g. delete-group 1
|
| Edit Group |
edit-group INDEX [n/GROUP_NAME] [t/TAG]… e.g. edit-group 1 n/CS2103 T12 t/study
|
| List Group | list-group |
| Find Group |
find-group KEYWORD [MORE_KEYWORDS] e.g. find-group CS2103T T12
|
| Add to Group |
add-to-group n/PERSON_NAME g/GROUP_NAME e.g. add-to-group n/Jensen Huang g/CS2103T T12
|
| Delete from Group |
delete-from-group n/PERSON_NAME g/GROUP_NAME e.g. delete-from-group n/Jensen Huang g/CS2103T T12
|
| Show Group Details |
show-group-details INDEX e.g. show-group-details 1
|
| Mark Attendance |
mark-attendance n/PERSON_NAME g/GROUP_NAME w/WEEK_NUMBER e.g. mark-attendance n/Jensen Huang g/CS2103T T12 w/10
|
| Unmark Attendance |
unmark-attendance n/PERSON_NAME g/GROUP_NAME w/WEEK_NUMBER e.g. unmark-attendance n/Jensen Huang g/CS2103T T12 w/10
|
| Show Attendance |
show-attendance n/PERSON_NAME g/GROUP_NAME e.g. show-attendance n/Jensen Huang g/CS2103T T12
|
| Add Assignment |
add-assignment n/ASSIGNMENT_NAME g/GROUP_NAME d/DEADLINE e.g. add-assignment n/HW 1 g/CS2103T T12 d/21-04-2025
|
| Delete Assignment |
delete-assignment n/ASSIGNMENT_NAME g/GROUP_NAME e.g. delete-assignment n/HW 1 g/CS2103T T12
|
| Edit Assignment |
edit-assignment n/ASSIGNMENT NAME g/GROUP [N/NEW NAME] [d/DEADLINE] e.g. edit-assignment n/HW 1 g/CS2103T T12 N/Assignment 1 d/21-04-2025
|
| Exit | exit |